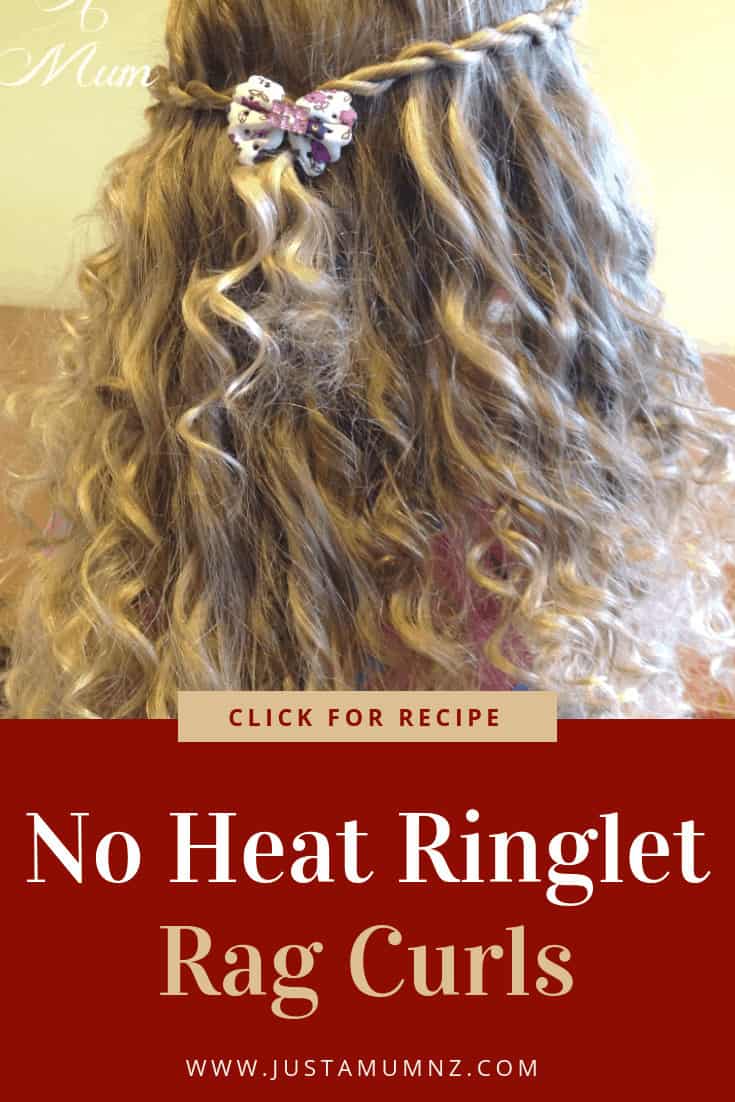
This beautiful style is super simple to achieve. No heat, no fancy tools, just a few rags and a good nights sleep! These No Heat Ringlet Rag Curls will become your new favourite hair style!
Posted September 19, 2014, Updated December 13, 2025
I often get asked how I do my girls hair. Like my wee slogan above says it’s the little things that make life fun and doing my girls hair in fun and different ways (occasionally……) it is one of my little things. Chances are that most often they are just given a quick pony tail but a couple of times a week we will bust out something more fancy!
My little 4 year old had a Kapa Haka performance today at a cultural festival – for those not in the know & not from New Zealand Google will help you know what that is all about! But she wanted to have her hair curly so she could have “pretty Kapa Haka hair”. As you do when you are only 4, but she is all about pretty things so as it does not take much time at all I thought why not.
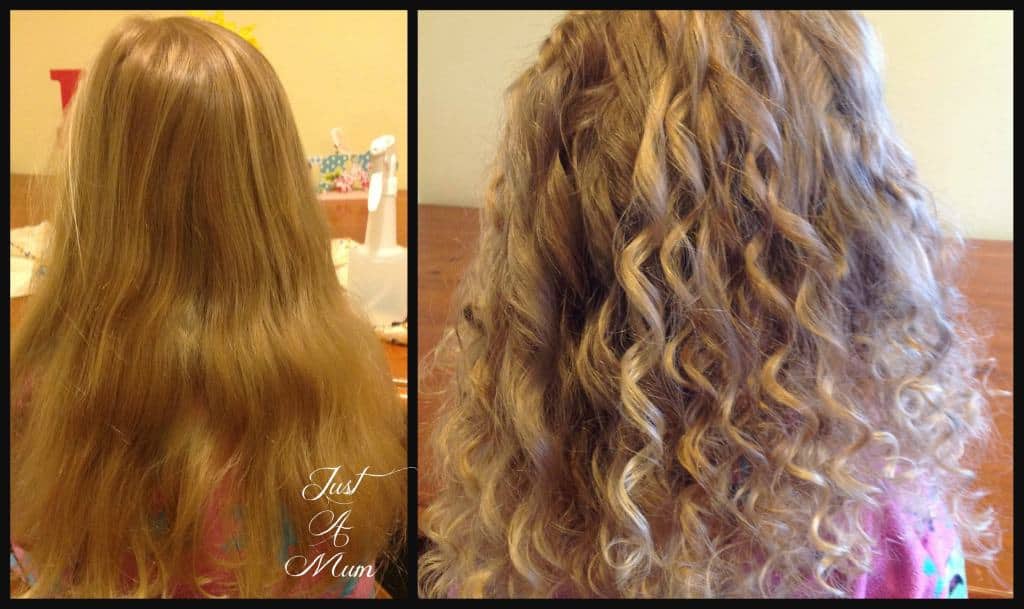
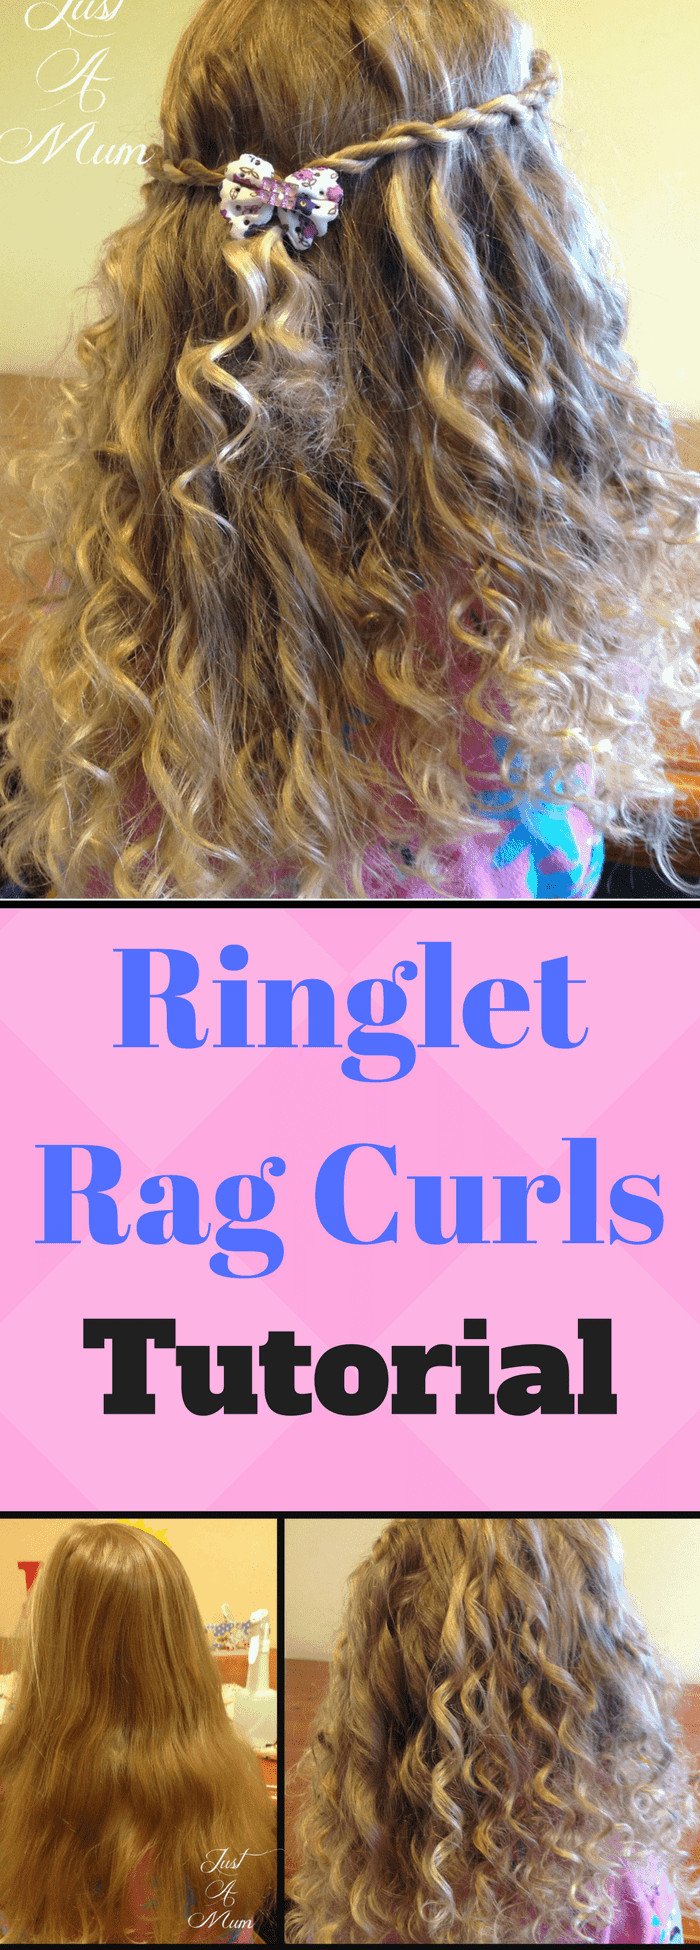
Before & After
Making curls with Rags has been done for a long long time – think 100’s of years! There are lots of different ways to do them to create different sorts of curls. This one is for a more spiral or ringlet curl. It is as easy as starting with wet hair, cutting 5 or 6 strips of fabric, separating the hair into sections, curling as per instructions below and allowing to set over night. I just use wet hair rather than using any products (she is only 4!) and I find the curl will last for days before it drops out. It is super curly day 1 and gets softer each day. You can however add a setting lotion or styling product to it if you needed once it is wet before you prepare it. Best of all NO HEAT!
My girls have no problem sleeping in them – and I always remind them that they are the ones who want curls and no pain no gain! lol not really but they will fall asleep and the rags stay in all night if tied well.
With her hair today I let the curls start a little dropped from the crown of her head – she was wearing a head band for her performance so I didn’t want to get in the way of that and also means it is less curly right from the scalp.
So first things first, get some fabric, thin cotton type fabric is ideal, not too thick but not stretchy (op shops sell it for little more than $1 at times or an old sheet) and rip or cut into 3 -4 inch strips 2-3 times the length of their hair.
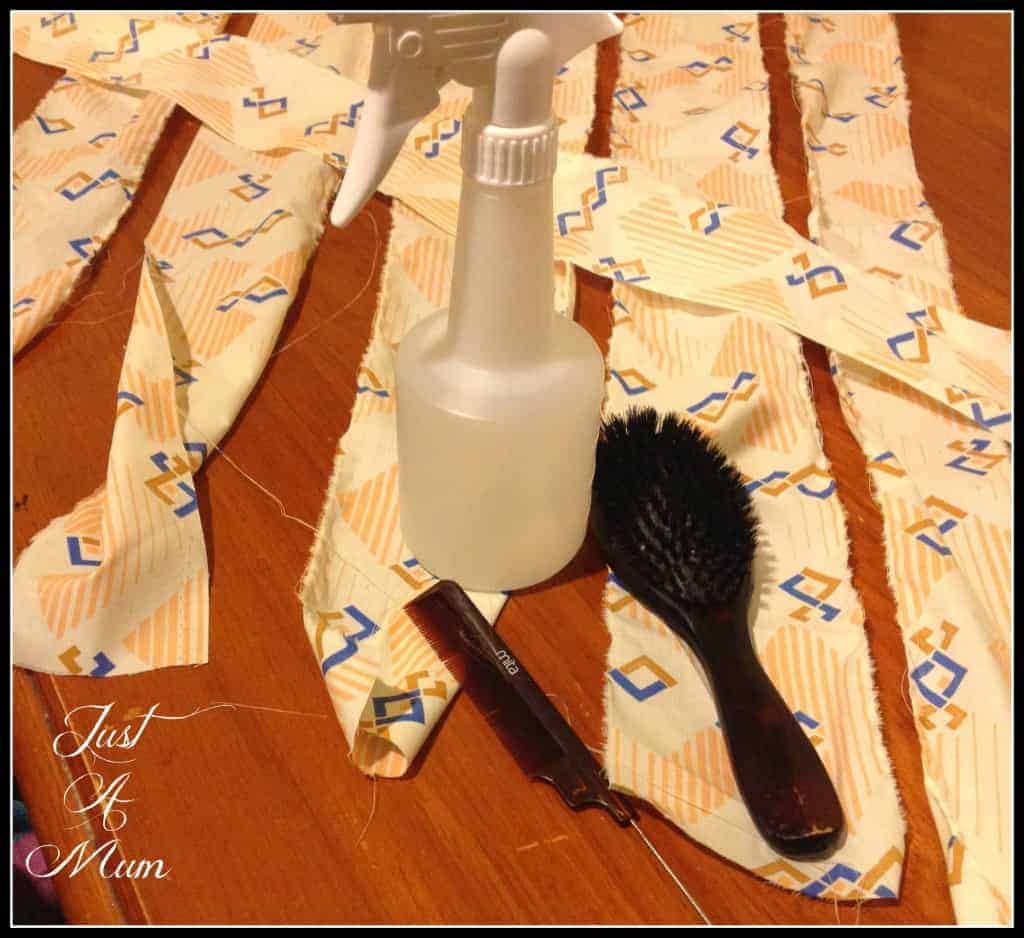
Cut Fabric into 3-4 inch strips at least twice the length of their hair.
Make sure the hair is damp but not dripping, either after a bath or shower or using a spray bottle as I did tonight. You can always add more water as you do each strip of hair.
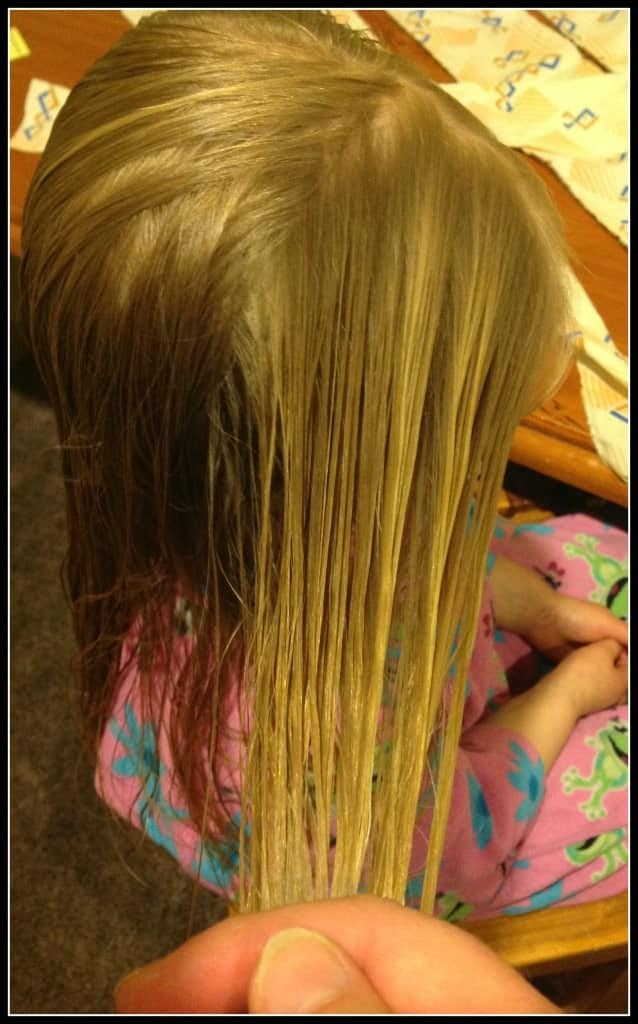
Begin with damp hair and take large sections each time.
Comb or brush the hair into the normal part they wear every day – or in the centre if you need this for the style you want. Then take the first section of hair – it is ok if it is quite a big section – 3 inchs x 3 as you separate the curls anyway once dry.
Hold up the strip of fabric and take approx. 5 inches past the top of the hair and ask your child to hold onto that piece for you while you begin the curl.
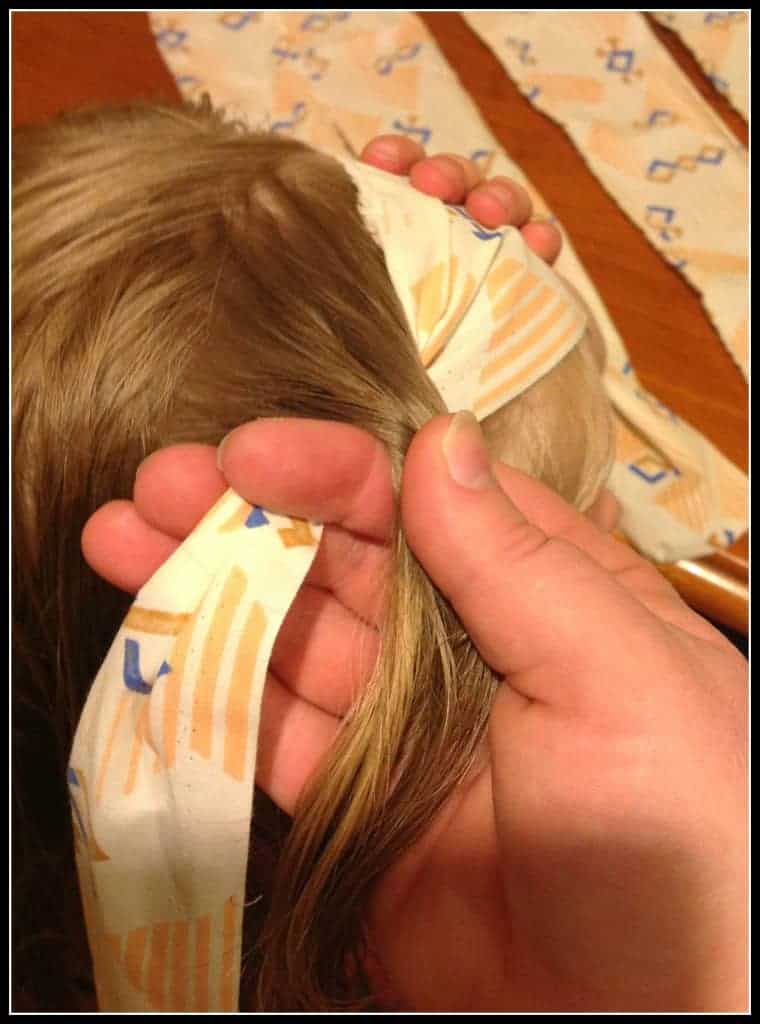
Take your fabric and have your child hold an overlap of fabric (approx. 4-5 inches)
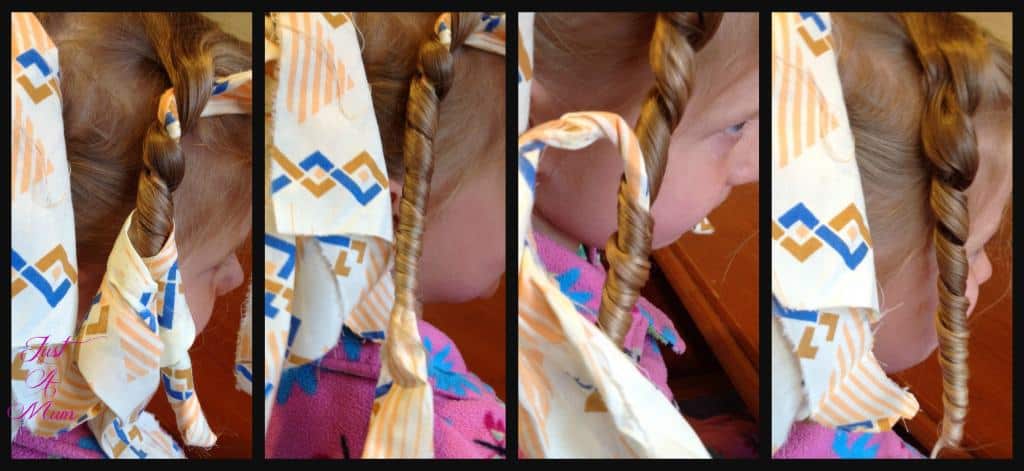
Take the rag to the left of the hair underneath, begin to wrap the hair around the rag – (not the rag around the hair or you will wake up with curly rags and straight hair!!). Wrap the hair tightly right from the first twist firmly against your head, ensure the curls are very firm around the fabric right from the start. 🙂
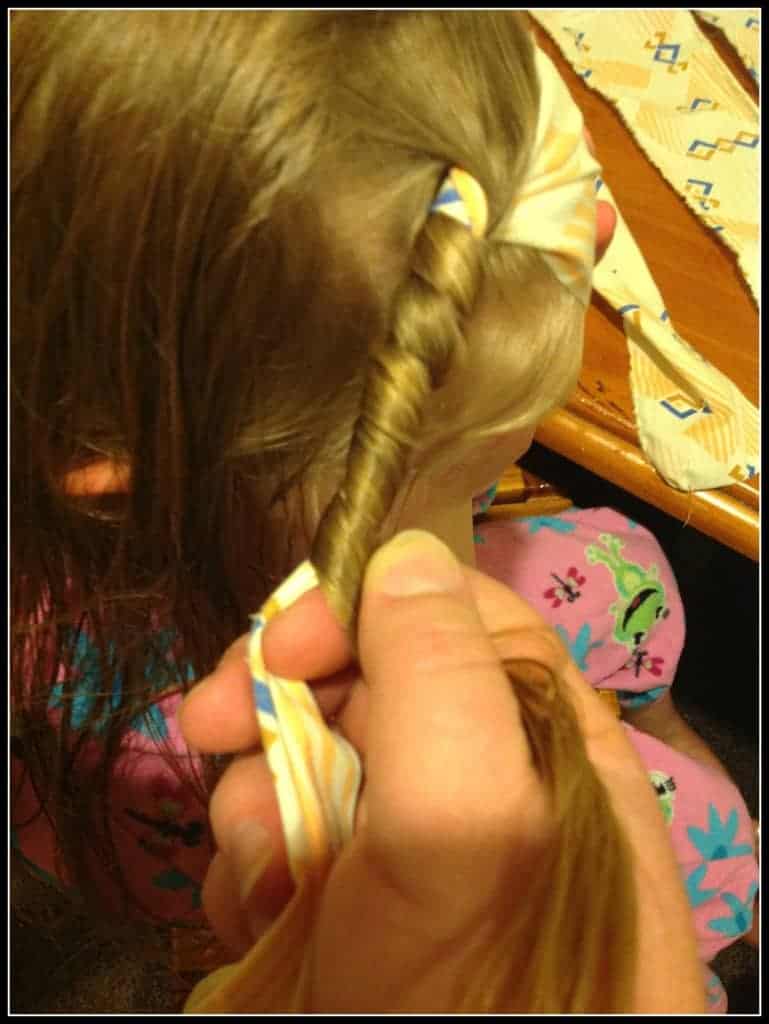
Wrap the hair around the rag all the way to the bottom
Once you are at the bottom of the hair, fold the rag back up over the bottom tip of hair and hold firmly with your thumb – flatten out the rag and begin to wind it back up the hair until you are at the top of the section of hair.
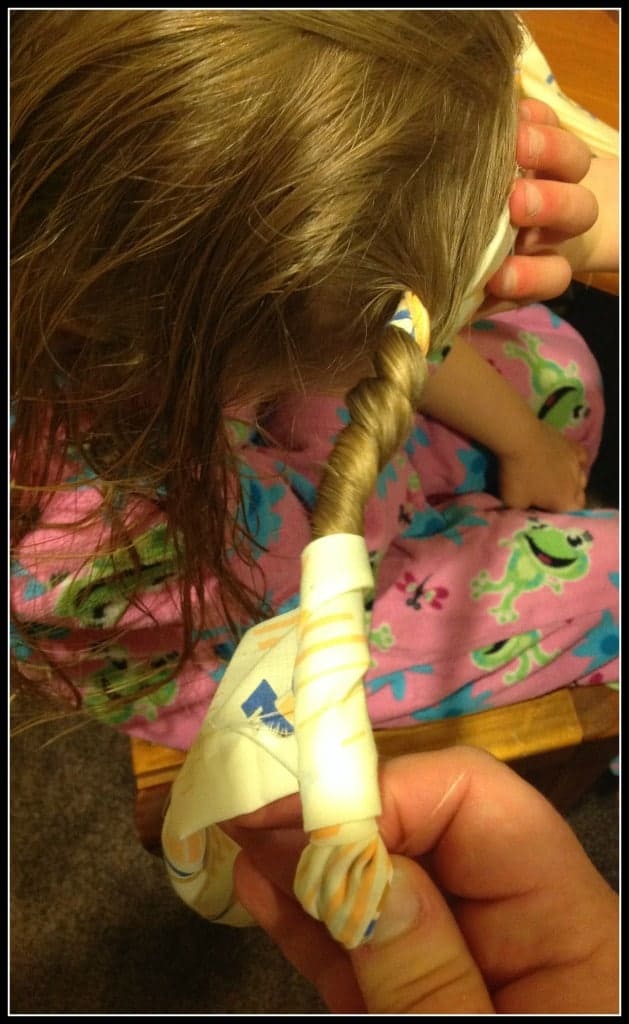
Take the excess fabric at the end of the hair and begin to wrap it back up the hair
Bring down the piece of fabric your child is holding and tie a double knot at the top of the section of hair.
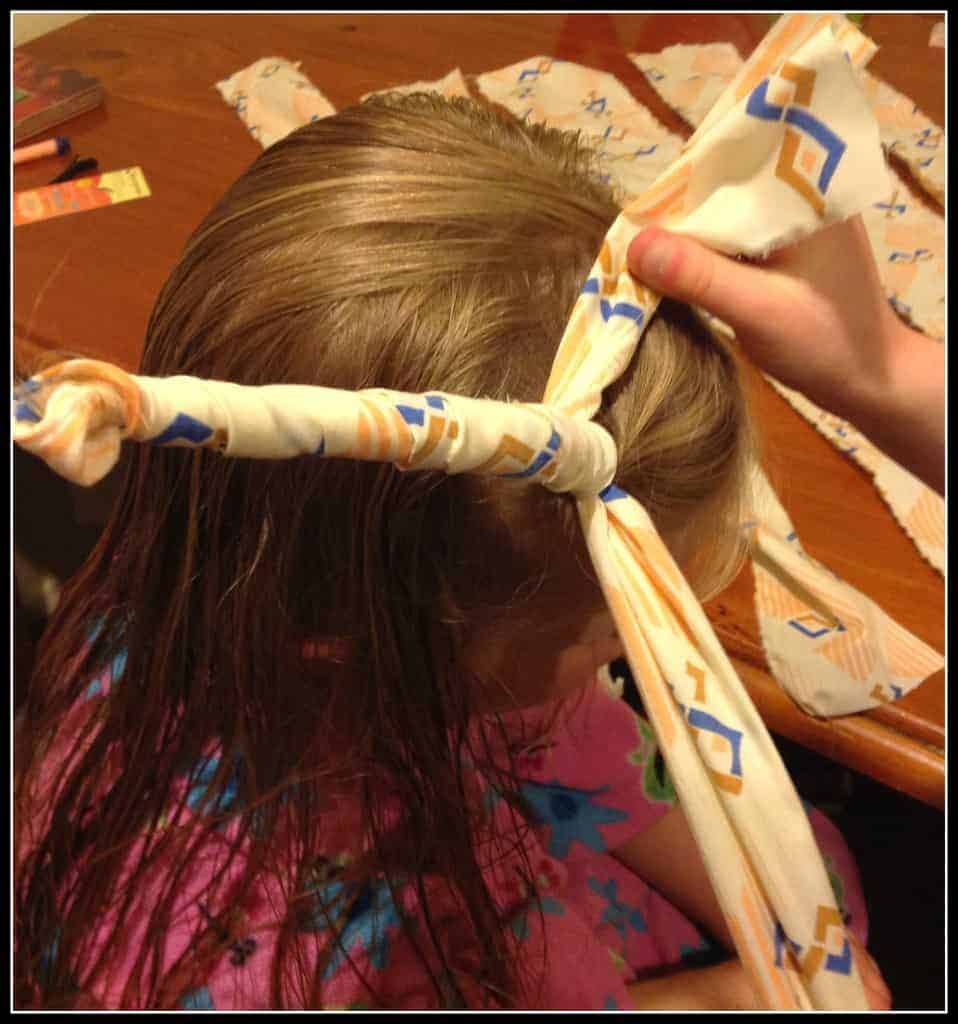
Take the two pieces and tie a double knot close to the hair
Repeat with the next section of hair. In terms of how many pieces of fabric you will need, before you begin take a rough look at your child’s hair and gage how many sections they need – in most cases it will be no more than 6 – two on the each side and two at the back, but some children will need more some less. If you want the curls to be tight to their head you will need more sections.
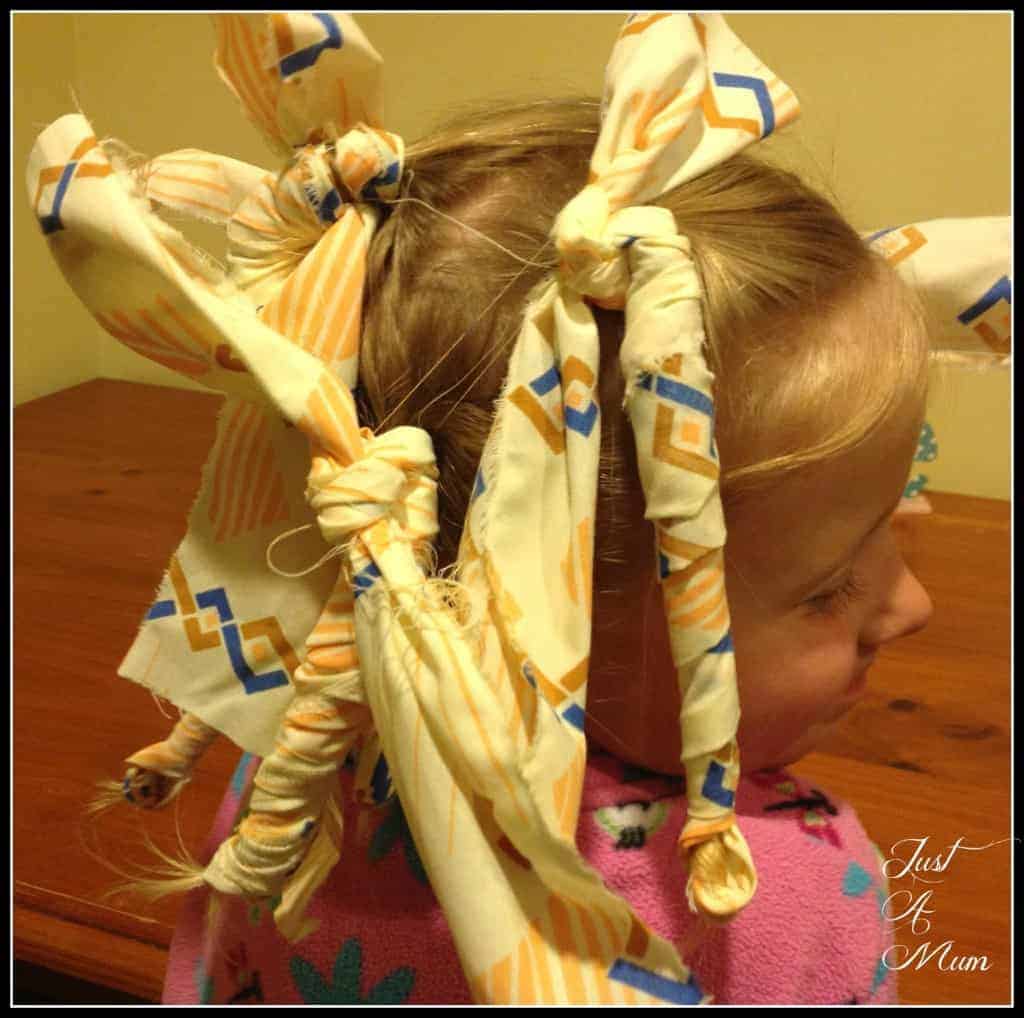
Repeat with remaining sections until all hair tied away
Once you have finished check all the knots are tight and secure. they will feel like they have sausages in their hair – but assure them this funny look will mean curls – lots and lots of curls!
Also important to remember that their hair will shrink up when curly so if they are starting with short hair – you might be surprised just how tight this style is and may wish to choose a different curl style. However, if you can imagine a little one with shorter hair and curls tied up into pigtails its pretty cute!
After sleeping on it I tend to keep them in it until they are dressed or ready to go. Start with the bottom rag and carefully unknot the fabric. Unwind the fabric first, then you can usually gently pull the rag out the bottom of the curl – if not unwind the rag from the hair gently. Do not be tempted to go near this hair with a comb!! Frizz alert if you do, just be patient 🙂
Start to remove the rags by undoing the knot, unravelling the fabric from the top then gently unwinding or pulling the rag out the end of the curl.
Once you have removed all of the rags you will have 6 tight looking ringlet curls, not the best look, but never fear, it gets better.
Gently take each curl and run your fingers through from the top of the curl to the bottom – separating the curls as you go – then take each thick spiral and begin to separate them from one another by pulling them apart – you want lots and lots of thin strands of curls so keep searching for thick ones until you are happy with the overall look. Do not use a comb, please! 😉
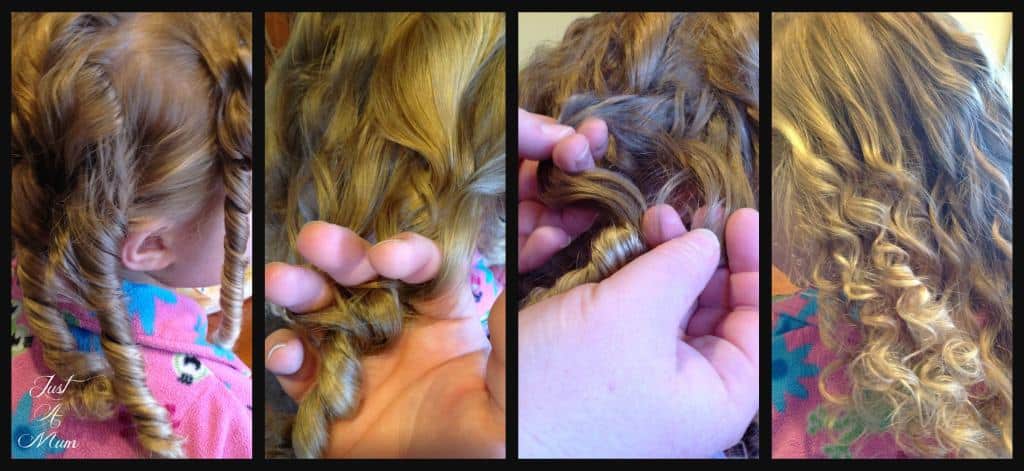
Carefully run your fingers through each curl, loosening the curls, then begin to separate individual strands until you have lots of separate curls.
Once you are satisfied with the look of the curls, and have searched all over for any thick curls to separate (they naturally will go back to larger ringlets during the day so may need to have this process done a few times – they are like curl magnets!) then you can begin to style the hair. You can do two simple side plaits, a rope twist as I have done or simply take two strands of hair from the temples and tie them back with a small hairtie. Simple is best to allow the curls to shine.
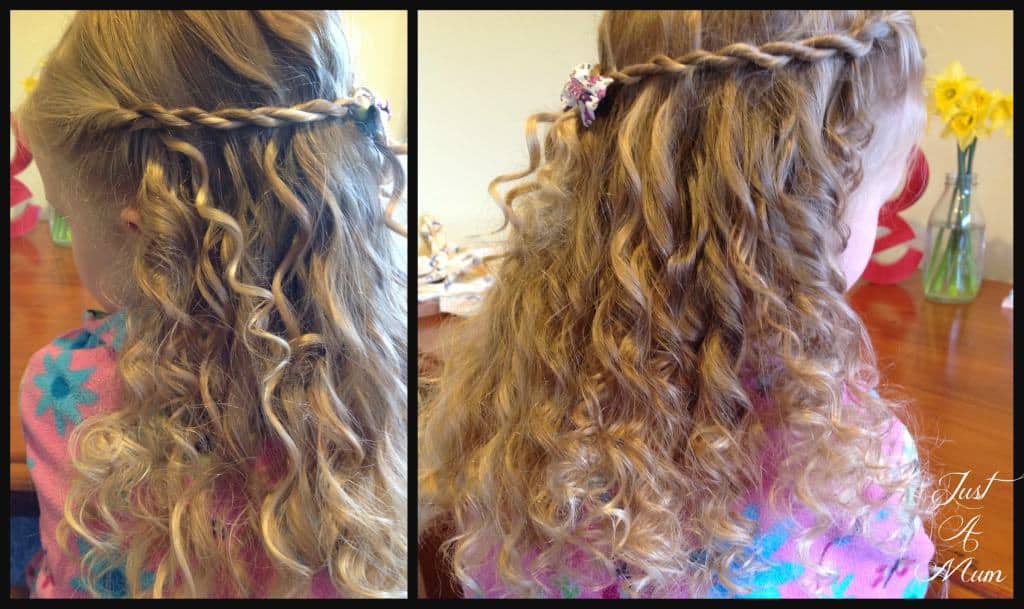
Simple Rope Twist to Finish
For the subsequent days you can have so much fun with this style – think pig tails, high pony tail with gorgeous girls, or a low pony when they have almost dropped out.
Pin It! Ringlet Rag Curls
I would love to see photos of your little ones when they have been curled and transformed and if you have any questions please do ask, I am never far away unless sleeping but I will respond as soon as I can so ask away!
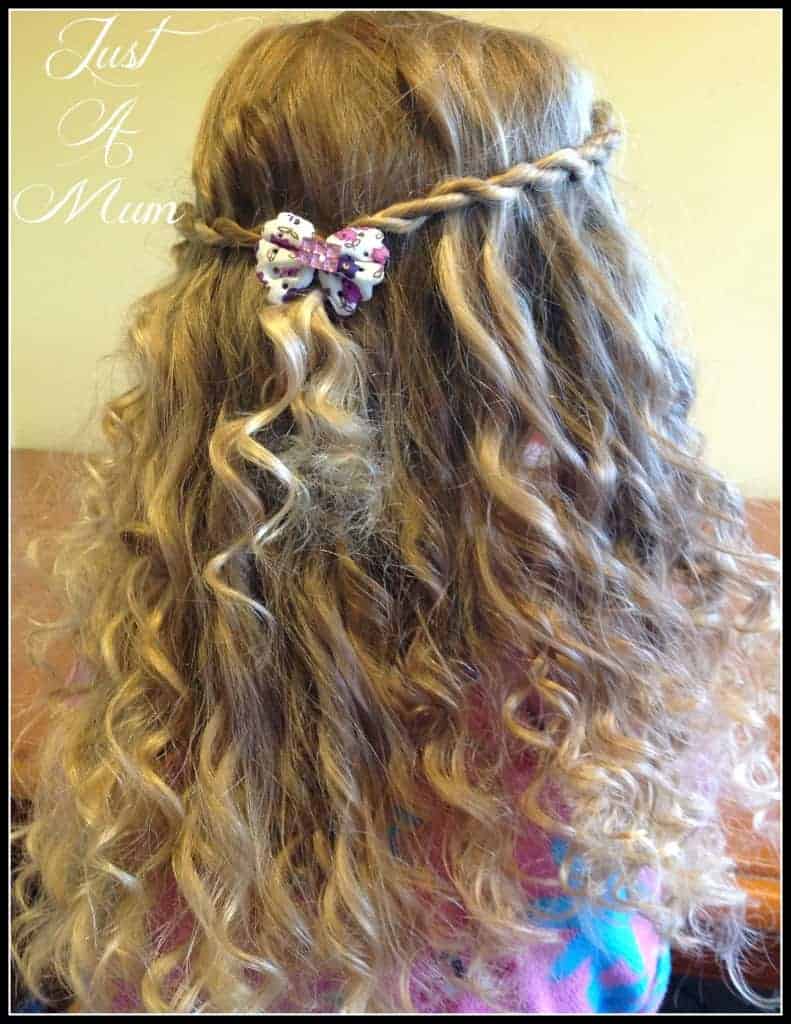
Beautiful Curls
Thank you for your patience while I try to explain this to you in words, will work on the video thing and see if I can share more of my fun easy hairstyles for girls with you all.
How did I do for my first tutorial? Let me know below in the comments section.
Thank you so much for stopping by to check out this recipe, you can follow me on Facebook & Instagram and also follow this blog via email to receive all my recipes as I publish them so check out the subscription box below.
Happy Baking!
Anna
Liz says
This is exactly how my mom did mine! I love how you explained this. Thank you!!
Anna From Just A Mum says
Thanks for letting me know, i’m glad you liked it! Anna
Gracie Robertson says
that looks so good and professional but the thing is that i do not have anything that can substitute for ripped up wach cloth is there anything that you can suggest to me please?.
justamumnz says
I would look for an old sheet at a local second hand store that you can wash and cut up?
Tegan walls says
I love it it is good on my little one but it still wont work on me
Anaya Bel says
Thanks for the help that how can we make curls. I just make curl a with the help of curling iron. You invent new way thanks
Joanne says
Hi there! Bought magic curlers for my daughter that were so frustrating! A friend told me to rag her hair & Google took me to ur page which has the easiest instructions! Have just done them, hope it’s a winner!
justamumnz says
That’s wonderful! Thank you so much for your kind words ? Anna
Robin says
If I want a high curly ponytail for my daughter ( for dance) should I make a ponytail first then put in rags? Or should I make the rag curls as you did then make pony afterwards? I tried hot rollers last year and the curls didn’t stay tight very well. Also how uncomfortable is it for them to sleep on? Thanks!
Robin
justamumnz says
Good question!! You can do either, perhaps have a test run on the pony first as you’ll have to tidy the ponytail anyway I guess . My girls don’t mind sleeping in them as they just rearrange themselves on a comfortable position. Depending on thickness of your daughters hair use smaller sections and hair product on the damp hair to help hold the curls ? let me know how you get on. Anna ?
Julia says
Is it possible to do this on my own hair? It sounds so simple to do but fear that I may need more than my two hands. My sister and I spent many many night with rags in our hair, we were told the same “no pain no gain” 🙂
justamumnz says
Lots of people on YouTube seem to do it on their own hair but I’m not that clever lol. Only idea I have for you is to make the strips long and perhaps hold one end in your teeth!! Let me know how you get on ?
Michelle says
Thank you!!!! I have googled this a few times in the past but your instructions are the best by far – really clear and easy – you also explained what I was doing wrong – curling the rag not the hair!! I am so excited to see how they turn out tomorrow – thanks again?
justamumnz says
Awesome! I’m so glad you enjoyed the post. Let me know how you get on ?
Paige says
Thank you for this tutorial! I have four girlies, and we’ve been into “Little House on the Prairie” lately. They’ve asked for rag curls, and I think this seems easy enough…. I like that it’s mostly done the night before, so we don’t have to be late for church because of our vanity 😉 And I totally agree: the little touches of fun are what makes the memories. 🙂
justamumnz says
Absolutely! The morning prep is quite easy, just style them as simply or elaborately as time allows! Feel free to share a pic of their “Church Ready” hair on my FB page ?
Laurie Bauman says
I have been hunting and hunting through different sites to find the way my grandma did my rag curls when I was a wee one. So, thank you thank you, thank you my journey is finished because of you! I can’t wait to try it myself!
Sincerely, A Grownup Granddaughter
justamumnz says
I’m so so pleased!!!!! I hope you have fun re-creating them ?
Jessica says
It turned out brilliantly! Thank you so much for this tutorial xx
justamumnz says
I’m so pleased! Have a wonderful Christmas ?
Jessica says
Love this. My daughters hair is naturally curly but as it’s grown the curl has become looser and looser. We’ve decided to give this a go tonight and can’t wait to see what it’s like in the morning. X
justamumnz says
Great!! Let me know how it goes ?
Gina Kelly says
Just done mine reallyhope they turn out ur daughter has beautiful hair thanks for the tutorial
justamumnz says
Thank you, she has just asked me to cut it short! Let me know how you get on ?
Helen says
I’m middle aged and have poker straight hair, I’m going to give this a go. I love spiral curls!
justamumnz says
Let me know how you get on!! Some styling gel may help hold longer ?
Chrisanne says
This is AWESOME!! A few of us ladies were talking about this today ( we are in our 60’s 70’s late 70’s)…and my Gramma did this ti my hair!! I could not for the life of me remember how…this is it Exactly!! Thank You Thank You!! This was an awesome find!!
justamumnz says
Oh you are so so welcome! In fact my wee girl is standing in front of me with 3 day old rag curls so they are dropping out now but still cute. ? thanks for stopping by my page ?
Tanya says
Congratulations on being featured on Wake Up Wednesday!
Check it out here – http://tanyaanurag.blogspot.com/2014/09/moghul-wuw-linky-party.html
Lou Lou Girls says
Thank you for sharing this! Pinned. Hugs! Lou Lou Girls
justamumnz says
Thank you 🙂
Divachyk // Relaxed Thairapy says
Thank you for sharing. I’m a hair blogger and I love seeing tutorials and such. I’m coming to you from Wake Up Wednesday – I’m a cohost. I’ve recommended your post to be featured in next week’s linkup. If you have a moment, swing by my blog and have a look around.
Karen says
Your daughter’s hair turned out beautifully! My daughter is six, and her hair looks very similar to your daughter’s (natural) hair. We both LOVE the ringlets and she wants to try this on her hair now – we’ve tried braids in her wet hair a couple of times, but this is a much “softer” look that I love. Thank you for sharing your excellent tutorial. I’m looking forward to seeing how it turns out for us. Pinning. Thanks for sharing with us at Wake up Wednesday!
justamumnz says
Thanks Karen – let me know how it goes – would love to see some photos! 🙂
Tanya says
These are just the kind of curls I love!! I have really long hair. Waist length! I hope to be able to do this.
Your girl is so adorable and I can imagine her excitement on seeing those curls 🙂
Thanks for sharing this at Wake-Up Wednesday, the party I am co-hosting.
-Tanya
http://tanyaanurag.blogspot.com/
Felissa (Two Little Cavaliers) says
This is lovely!
I would be honored to have you hop over and share with us at Inspire Us Tuesday.
(http://twolittlecavaliers.com/2014/09/inspire-us-tuesdays-apple-treats.html)
justamumnz says
Thank you for stopping by – it really is easy! I will pop over now 🙂
Joanne Swanepoel says
Best i get onto this and have a go before she is swimming everyday at the lake! I know you and i talked about it a year ago but now i must try then i can teach her to do mine!
justamumnz says
It is surprisingly easy Jo – I hope you girls have fun! 🙂
melanie says
They look so beautiful. Really natural. I remember My mum doing my hair as a kid and I have been trying to remember how they are done because miss 6 is keen for some curls. Thanks so much !
justamumnz says
Thank you Melanie, let me know if you try it 🙂
Taryn Dryfhout says
Your wee girl looks like she has naturally beautiful curls – looks lovely!!!
justamumnz says
Thank you! She has had lots of comments in past few days on her pretty ringlets – that are not real! 🙂
Megs says
I remember my grandmother doing this to me when I was young, thanks for the memories! Anyway, my question is (cos I was young so long ago lol), about how long would it take to do the curls?
justamumnz says
Hi, good question! It took me about 15-20 minutes to tie the rags and I left the hair overnight to dry, or if you tied them in the morning they would be dry by the end of the day for a style at night 🙂
Deborah says
My grandmother did as well