OUT NOW Order my beautiful new cookbook – signed and personalized copies available

  • Home
  • About & Contact
  • Privacy Policy
  • Terms & Conditions

Just a Mum's Kitchen

  • Home
  • Sweet Recipes
    • Muffins and Cupcakes
    • Cakes Recipes
    • Loaves
    • Cookies and Biscuits
    • Slices and Brownies
    • Confectionery
    • Desserts
      • Cheesecakes
  • Savoury Baking
    • Dinner Recipes
    • Soup Recipes
    • Salad Recipes
  • Slow Cooker Recipes
    • Slow Cooker Dinners
    • Slow Cooker Desserts
    • Slow Cooker Soups
    • Slow Cooker Vegetarian Recipes
  • Christmas Recipes
  • Shop
    • Cookbook Out Now
You are here: Home / Kids Activities & Hairstyles / Make your Own Glitter!

March 7, 2014 · 1 Comment

Make your Own Glitter!

Kids Activities & Hairstyles

  • Share
  • Tweet

Making your own glitter is quick, fun, and surprisingly easy – a great little DIY the kids will love for craft time or adding sparkle to their projects

Posted March 7, 2014, Updated December 11, 2025

Homemade Glitter in jars


Kids love making up homemade versions of every day things – and this homemade glitter is so easy to make with just 2 simple ingredients!

We have gone green today as St Patrick’s Day is coming up but you can make any colour of the rainbow and more, mixing and blending colours until you get the perfect shade.

What you will need:

Epsom Salts (ordinary salt will do but Epsom Salts shimmer and are a cool texture)
Food Colouring
Small Sealable Bags
Containers or Bags to store the finished glitter

Homemade Glitter Ingredients


Method

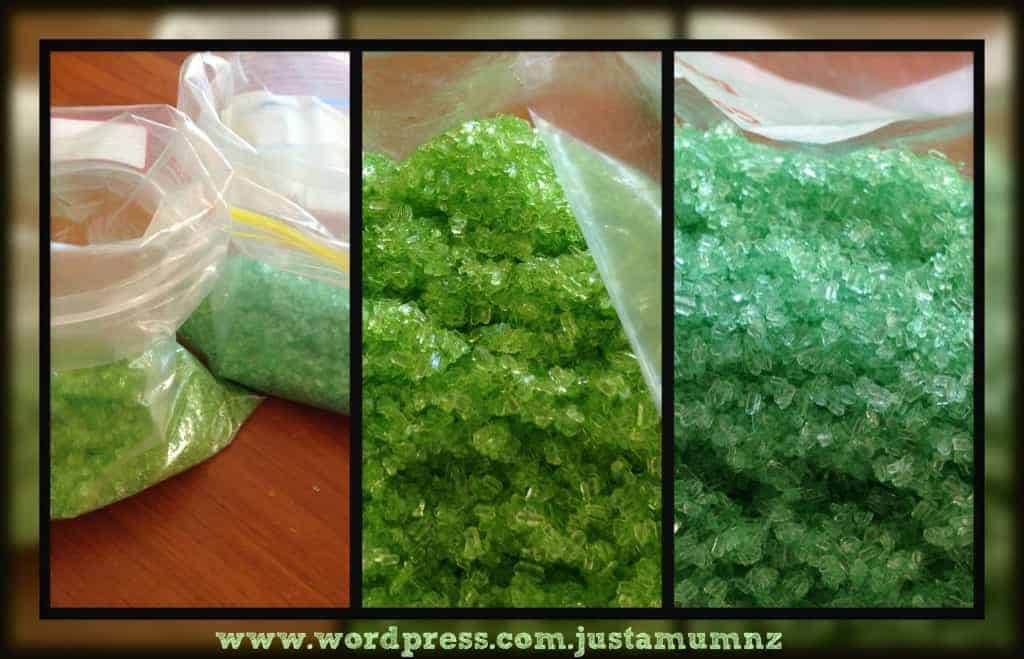
Add the desired portion of salt to the sealable bag and add a few drops of food colouring – seal the bag then mix, shake, blend and add more colouring if desired. We made a green one, dark green and a green mixed with yellow one – this vibrant goldie green is my favourite green at the moment – perfect for St Patrick’s Day!

Homemade Glitter died green


Once the salt & colouring are completely blended open the bags and air dry them – this may take any where from a few hours to up to a day depending on the amount of salt & colouring you have used.

Homemade Glitter


Once dry pop them in a container or air tight bags and use for any number of fun sparkly creations!

Homemade Glitter in jars


How easy is that?

Thank you so much for stopping by to check out this recipe, you can follow me on Facebook & Instagram and also follow this blog via email to receive all my recipes as I publish them so check out the subscription box below.

Happy Baking!

Anna

Sharing Is Caring!

  • Email a link to a friend (Opens in new window) Email
  • Print (Opens in new window) Print
  • Share on Facebook (Opens in new window) Facebook
  • Share on X (Opens in new window) X
  • Share on LinkedIn (Opens in new window) LinkedIn
  • Share on Pinterest (Opens in new window) Pinterest
  • Share on Tumblr (Opens in new window) Tumblr
  • Share on Reddit (Opens in new window) Reddit

Like this:

Like Loading...
« St Patrick’s Day – Honey Rice Bubble Crunch
Magical Coloured Flowers – Chemistry Fun »

Comments

  1. Celeste (Leapfrogandlipgloss.com) says

    March 7, 2014 at 1:33 pm

    Ah, how cool… I never thought about making my own glitter before. Would love for you to link up in the Let’s Get Real Blog Hop this week if you haven’t already 🙂 http://leapfrogandlipgloss.com/lets-get-real-blog-hop/

    Loading...
    Reply

I love hearing from you! What do you think of this recipe?Cancel reply

This site uses Akismet to reduce spam. Learn how your comment data is processed.

Anna Cameron

Anna Cameron

Welcome to Just A Mum's Kitchen

Buy Now 📚 Just A Mum’s Kitchen Cookbook

Just A Mum’s Kitchen CookBook

Just A Mum’s Kitchen CookBook
  • Privacy Policy
  • Terms & Conditions
  • About & Contact
Copyright © 2014– Just A Mum’s Kitchen | Part of the Just A Mum Ltd Network. All Rights Reserved.

Copyright © 2026 · captivating theme by Restored 316

11 shares
%d