People have been asking me to share this delicious recipe for some time, with all my simple tips I am delighted to bring you this light fluffy Easy Sponge Cake Recipe
Posted November 21, 2019, Updated December 2, 2025

I am certain this is not MY sponge cake recipe. It has been in my handwritten recipe book for years so it will definitely originate somewhere else but I have enjoyed perfecting it over the years and gathering my tips to share with you below.
There are many variations on sponge cakes, this is just the one I like to make. There are many that do not include butter, often considered the traditional sponge, some with cornflour, and of course everyone thinks THEY make the best sponge.

Apparently my Grandmother would drop her sponge & tin on the kitchen floor as soon as it comes out of the oven to ensure it doesn’t collapse, which seems like the total opposite to this method where you want to be more careful so that it stays light! Either way, this one is good, the other recipes are good too. Maybe I should just test them all!
I know sometimes these blog posts can appear long winded and full of chatter but I try to share more information throughout these posts rather than chat about my day so I hope you find this useful to read through before you embark on your sponge cake today! If this is your first time making a sponge take a minute to read what comes next.

Sponge Cakes are a delicious light cake, sometimes called a Genoise because of the added butter in this version, but they are a Sponge rather than a Cake because of all the added air and so little fat. The air is created due to the extended beating of the eggs, and the overall lightness of the ingredients and technique. I hope to give you a great method for creating this recipe yourself so you will be able to store this one away and enjoy making them forever.

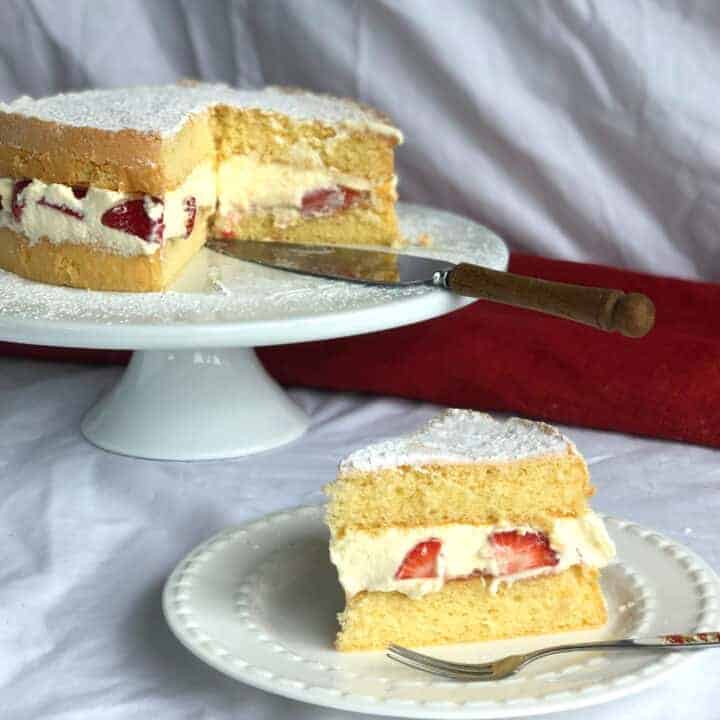
If you are already a super sponge maker then feel free to add any of your own tips in the comments down below. I know there are lots of versions and lots of experts out there! I am not but its nice to share what I know for those still learning. There are many ways to serve sponge cake, our favourite is with lashings of cream, strawberries and jam. You can leave this plain, or even use as a base for Lamingtons!

The key to a lovely light sponge is to create air. This begins with the 10 minute beating of the eggs and sugar. This allows a lot of air to incorporate into the mixture, you can do this with either hand held electric beaters or the whisk attachment on a food processor. Next is sifting your dry ingredients 3 times to ensure once added they are as aerated and light as they can be, and finally very gentle combining of the ingredients. Some use their hands, I prefer to use a large metal spoon.

There is a bunch of equipment I like to have on hand, it might seem excessive but it works for me to recreate a gorgeously light and fluffy sponge. But you can do whatever works for you.
They are
-
Food Mixer or Hand Held Mixer, with glass or metal bowl only
-
2 Cake Tins of the Same Size
-
2 Medium Bowls
-
Sieve
-
Metal Spoon
-
Scales

The two bowls and sieve is to make the triple sieve easy for the dry ingredients, I simply pour from one bowl to the other through the sieve. I have included a video showing all of my steps for how I make my sponges. The scales are for measuring the batter in each cake tin to ensure they are the same size, you can of course just do this by how it looks.

Just A Mum’s Top Tips for The Best Easy Sponge Cake Recipe
Cake Tin Prep – I use two 20 cm round cake tins (8 inches). The first tip, you do not want to line sponge cake tins, it is important that it can form a crust against the sides of the tin. This is due to the cake having so little fat content. If you line the tin the sponges will be soggy. The Cake Tin Prep is simply a matter of greasing the tin with butter thoroughly, then adding flour and wriggling that around the tin until both the base and sides are covered in a thin but complete layer of flour.

Room Temperature – Ensure your eggs are at room temperature before you begin. If you forget this step you can bring them to room temperature more quickly by breaking them into a bowl which allows the air to warm them, or by steeping the eggs in their shells in luke warm water.
10 Minute Beating – On a medium speed you want to whisk the eggs and caster sugar for 8-10 minutes. This incorporates a lot of air into the mixture. You know the mixture is ready when you can drizzle the batter back onto itself and it sits on top of the mixture for a bit before dissolving. I check at 8 minutes, but always need the extra two minutes.
Triple Sift – I always triple sift my flour and baking powder, using two bowls, I simply tip the dry ingredients between two bowls to sift three times, this ensures it is light and airy. Also be sure when you are measuring your flour initially you fluff up the flour before scooping, level off your flour with a knife and do not tap it to settle. This ensures the correct measurement.
Folding – You can either use your hand or I use a large metal spoon to incorporate my flour mixture and then the butter. A gently cutting and folding movement ensures you do not lose that precious air you created with the 10 minute beating
Weighing – Ensuring all the ingredients are measured correctly is important, but also it is nice to have even sized cakes. So in order to achieve the even cakes, I measure them as I pour in the batter. Using my scales and ensuring that first my cake tins weigh the same, I pour approximately half the batter in the first pan while it sits on the scales, usually just under half. Then I pour half into the next pan on the scales. Then I alternate and top them up until they weigh the same. Then gently turn the pans to cover the base evenly of each pan

Baking – When placing the cakes in the oven be careful not to knock them or you will remove the air, then it is important to not open the oven for the first 15 minutes at least or they will collapse. They take between 15 & 18 minutes depending on your oven. You can usually fit both cakes on the one shelf for even cooking so you can use the basic Bake function. Do not pierce with a skewer to test if done, again this will collapse the cake. Instead it will bounce back to the touch once cooked.

Cooling – Once you remove from the oven you want to immediately turn the cake out onto cooling racks. To do this I have the racks ready, and turn the cake out onto my hand then invert onto a wire rack as per my video. This way the base goes on the rack ensures that the wire marks are on the middle. If you want no wire marks then simply place a few tea towels on the wire rack first. Ensure the sponges are away from a draft as this can also cause them to sink.

How your serve your Sponge Cake is completely up to you. We like ours with Jam, Cream and Strawberries if they are in season. Because this mixture makes two separate cakes there is no need to slice it in half which makes it nice and tidy to serve!
It is hard to believe such a small amount of ingredients can make two lovely halves of a sponge. Sponges are best served fresh so if you are not eating it straight away I recommend wrapping the cakes in plastic wrap until ready to use, then assemble just before serving.

I then like to dust the sponge cake with a lovely dusting of icing sugar to finish. You can serve this straight away, I think sponge is best served just before eating as it is light and fluffy. Alternatively if you do need to store a cream filled sponge store it in the fridge which can make it go a little hard, so bring up to more of a room temperature slightly before serving if you chill it.
Are you still with me or have you simply scrolled on by to get to the recipe? I hope all these tips are helpful for first time sponge makers. I am no expert and I know people have been making sponge cakes for hundreds of years, it does not need to be complicated but it does have those few tips to make your sponge a winner each time.
Sponge cakes can be a little more sensitive, so if yours hasn’t risen or turned out as expected, you might find this cake troubleshooting guide helpful.
Check out this post for my Easy Whipped Cream Recipe here

If you like the look of this Easy Sponge Cake Recipe then check out more of my delicious cake recipes here
Enjoy this light and Easy Sponge Cake Recipe!
Easy Sponge Cake Recipe
Delicious light and airy, this is a lovely Easy Sponge Cake Recipe, lots of tips and hints to get the perfect sponge every time.
Ingredients
- 3 Large Eggs, room temperature
- ¾ Cup Caster Sugar, 165 g
- 1 Cup Plain White Flour * (less 2 Tablespoons, see below instructions), 132 g total
- 1 teaspoon Baking Powder
- 50 g Butter, melted
- 2 Tablespoons Boiling Water
Fillings
- Whipped Cream
- Strawberries
- Strawberry Jam
Instructions
- Preheat the oven to 180°C and place one rack in the centre of the oven. Grease two 20cm round light coloured cake tins with soft butter then thoroughly dust the base and sides with a few tablespoons of flour, tip out excess flour, and set aside.
- In a large glass or metal stand mixer bowl, add room temperature eggs and caster sugar. Beat on medium speed for 10 minutes, until a trail stays on top of the batter.
- From the measured cup of flour, return 2 tablespoons to the bag. Sift the flour and baking powder together between two medium bowls using a fine sieve 3 times, to make it light and airy and set aside.
- Melt the butter and boil the kettle. Once the egg mixture is ready, add the flour, gently cut and fold the flour into the mixture with a large metal spoon, keeping as much air as possible until no visible flour remains.
- Combine melted butter with hot water, carefully pour it into the batter and fold and cut again gently until fully incorporated.
- Divide the batter evenly between the prepared tins (using scales helps ensure accuracy). Gently smooth the tops without knocking out air.
- Carefully place both cakes in the oven on the same oven rack and bake for 15 minutes without opening the door. Check if the sponges spring back to a light touch (avoid using a skewer). If not done, bake for an additional 2-3 minutes.
- Remove the cakes from the oven carefully and immediately run a knife around the edges to release the sponges.
- Working very gently, invert each sponge onto your hand or a small wire rack, then place the a wire rack onto the base of the sponge and invert again, ensuring the top of the sponge faces up.
- Allow the cakes to cool completely away from drafts. Sponges are best served fresh, but if assembling later, wrap cooled sponges separately in plastic wrap.
- To serve, on a serving plate spread the base layer with my Easy Whipped Cream recipe, strawberry jam, and fresh strawberries. Store in the fridge if using cream and not serving right away.
- Enjoy!
Notes
Please see ALL of my notes in the main copy of my blog, lots of great tips to know before you begin to bake.
For the Easy Whipped Cream recipe please visit here
Nutrition Information
Yield 12 Serving Size 1Amount Per Serving Calories 218Total Fat 12gSaturated Fat 7gTrans Fat 0gUnsaturated Fat 4gCholesterol 79mgSodium 91mgCarbohydrates 24gFiber 0gSugar 16gProtein 3g
JustAMumNZ.com, occasionally offers nutritional information for recipes contained on this site. This information is provided as a courtesy and is an estimate only. This information comes from online calculators. Although justamumnz.com attempts to provide accurate nutritional information, these figures are only estimates.
Thank you so much for stopping by to check out this recipe, you can follow me on Facebook & Instagram and also follow this blog via email to receive all my recipes as I publish them so check out the subscription box below.
Happy Baking!
Anna
Pin it!
Chris says
Total fail! For the first time ever I didn’t line the tins with baking paper, tho I followed your instructions to grease well and flour. Cakes stuck like glue to the base grrr. And they are as flat as a pancake.
justamumnz says
Oh dear. I wonder why that’s happened. It’s such a popular well tested recipe. The reason for not lining the sponge tin is to create a slight crust on the edge so this is done with butter and flour which is a common method that, if done well on a suitable tin, should always release the cake. However since you say the sponges are flat I assume something hasn’t gone quite right with the recipe as this is a very airy sponge. Possibly an issue with the flour or quantities somewhere along the line? Are you using grams or metric cups? Feel free to email me or reach out via social media DMs to see if I can help you further. Anna
Amanjeet Kaur Gill says
Hi, can I just half this recipe to create only one cake? I have tried to make sponge cake before but failed miserably. I think my downfall was not being able to tell if they are cooked or not. Not using the skewer seems too much for my baking confidence 😅. So, don’t want to waste everything again only for it to fail.
Soohee says
Hi
Any tips if I make the rainbow sponge cake for my girls birthday cake. Food colouring to add to the wet ingredients, any suggestion is appreciated.
justamumnz says
Sponges are so delicate and require minimum touching once the flour folded through as you can see from my tips here. I absolutely can suggest how to create a rainbow vanilla cake but I’d be hesitant to suggest separating and mixing colours into a sponge since the batter needs such care. To colour a vanilla cake (search for my Grandmas Wonder Cake) you separate the batter into small bowls, then add a drop or 2 of food colouring to each and stir it through. Then in a well lined cake tin pour in each colour in turn, adding the next colour directly on the last, no need to spread the layers. Then bake as normal. I hope this is helpful.
Grace Davis says
ours was an omelette.. what did we do wrong?
justamumnz says
Oh dear! I’ve never heard of that before sorry. Have you read back through the full blog post, recipe and method to see where it might have gone wrong?
Trent says
Hi. Just wanting to ask if you used a fanforced oven on 180 degrees or
Huma says
What a PEREFECT sponge cake!!!!! I have tried tens of recipes but this is a 5 star rating. Awesome. Follow the steps and it turns out to be how you said it. Love from NZ
justamumnz says
I am so pleased to hear that!
Lisa says
I was looking forward to making and eating this sponge. I regularly make your recipes, and always have success-until this cake!
I read all the tips and followed the instructions, however my cake came out stodgy & heavy, not at all like the light sponge cake I was expecting.
I’m not sure where it all went wrong?
justamumnz says
It is so hard to know without being there with you I am sorry. Usually it is because there was not enough air incorporated into the batter so undermixing.
Lyn says
I have made this so many times it never fails it is the best sponge I have ever made. Every body comments on how delicious it is. I fill it with fresh cream and bananas passion fruit icing on top. Yum
Gay says
Thanks so much for your concise and well-written notes. I followed the recipe to the letter, with success. The cake had that authentic sponge texture and slightly eggy flavour, mmm!
justamumnz says
Wonderful! I am so pleased it worked well for you.
Courtney Black says
Could you split this recipe into 3 x 7inch pans?
simon dykes says
I have tried to make sponge cake (not your recipe) and both times the cake rises but then half way through the bake it sinks. It still tastes ok but obviously doesn’t look good and not sure what the cause. The other thing I notice is some recipes say once everything, ncluding flour, is combined then continue to mix/beat well whilst others like yours recommend minimum mixing/folding once you add in the flour
justamumnz says
There are many methods I agree. This one is simple and thorough in the hope it helps people get it right! Let me know how you get on with my method.
simon dykes says
Can you just confirm that you use plain flour and not self raising flour for this recipe. All the other recipes I read use SR Flour AND baking powder but you appear to use plain flour
justamumnz says
That’s right, plain white flour, recipe is correct 🙂
Jess says
I made your cake today and it turned out just as you said it should! Thank you for all your tips, they came in real handy. We are in Qld Australia ♡
Janna Durano says
Hello! I am about to make this cake. Just wondering what if i only have 1 x 20cm cake tin. Can i just cool all the batter at once then slice it in half or can i cool half at a time?
justamumnz says
Probably better to cook half at a time otherwise it may overflow, but second one may not rise as well as first.
Ruth says
This is not a sponge. A sponge doesn’t have butter in it.
justamumnz says
Thank you for your feedback
Jo says
I used this recipe to make my first ever sponge cake and the cake turned out really well. The tips are worth reading. If you are wanting to make a sponge cake you should give this one a go.
justamumnz says
Thank you, lovely feedback
Pam Badawy says
Hi Anna
Thank you
I am not a baker and I’m a little older many of your follows and in all those years I have never attempted a sponge – far to scary a process
My darling husband requested a sponge cake for his birthday ( intending I should buy one from Woolies) but I thought it was time !
I stumbled across your site and with such extensive instructions- I decided to give it a go!
The result was not perfect but I was so thrilled as it tasted so good that I have just finished making my 2nd as my daughter insisted on one for her birthday
Thankyou
I have just subscribed to your blog as I have a new found confidence to give it a go due to your detailed instructions
I look forward to attempting further baking
Regards Pam
justamumnz says
Hi Pam! Oh I am so pleased to hear that. Thank you for such lovely feedback. Anna
Joanna says
Geez, Anna, what is size 7 egg??? It sounds worse that the European Union 15cm carrot standard they use in Western countries! Has Australia and NZ such crazy artificial measures instead of normal eggs etc? I love your blog and your recipes, commented and complimented you so many times but this here sound like Orwell’s BIG Brother recipe for me 😛
Mish says
Hi,
Can you please confirm that a size 7 (NZ) egg is medium size as all conversion charts Ive checked are saying size 7 eggs are large (AU) 62g?
Kind regards
Mish
Bonnie Forbes says
Thanks for the tips!
I’ve combibed my great nannas sponge recipe with your tips and it’s heloed created a fantastic result for my sponge. I actually used two loaf tins so it’s easier to slice and serve.
I also don’t add the butter and hot water to the mixture.
I’m looking forward to trying the firm whipped cream recipe. I was a little confused with the 50 ml cream in the small bowl? Do I add the pudding mix and essence and icing sugar to that before adding it to the 250 mls of cream?
Thanks again Anna
?Bon
justamumnz says
Yes, add it to the small amount of cream first. So glad you’ve enjoyed combining the recipe with your Nannas
Paula Oliver says
I tried your recipe today as my first ever sponge cake. It was delicious! And it didnt sink! Got stuck in the pan even though i greased and floured it ?
justamumnz says
Oh no. I’m sorry to hear. The greasing and flouring is so important and can be a little tricky to get right initially. I hope you could still enjoy it.
Catherine Henry says
Hi Anna. I have never made a sponge before so this was my first attempt. I followed all the instructions and read all your tips. My cake didn’t rise. Just wondering if you can advise me. Thankyou.
justamumnz says
I am so sorry to hear that, it is hard to know where it went wrong without being there. Some things to check are the freshness of the eggs and baking powder. The reason a sponge rises is due to the air bubbles that are creating from the long mixing time, in this case up to 10 minutes. So with the combination of this technique and the rising agents is what makes a sponge rise. Gently folding through the next ingredients means that none of that lovely air escapes. It might be a matter of practicing more to get that lovely lightness if you think your ingredients are fine. Let me know how you get on. Anna
Jacqui says
I think my eggs may have been a little large, I beat them for 13 mins and I couldn’t get them to hold as you described – mine were about 58g each. How much does a ‘medium’ egg weigh? Other than that, I followed all your tips on how to make a sponge cake and for my first attempt, I was very pleased.
Mary Booth says
I don’t understand what you mean by size 7 eggs or cup of flour. Can you help me as our eggs are small medium or large and weights here in the U.K. are in either grams or ounces. Thank you.
justamumnz says
Thank you for your message, if only measurements worldwide were the same! I have amended the recipe to include grams and the egg size is medium. Happy baking 🙂
Megan Woolridge says
Pls put share option on.
justamumnz says
Hi, not sure what you mean sorry?
mubshra sattar says
I tried this sponge cake today and it turned out fabulous. My cake had never been so spongy. It was amazing. Thank you so much for sharing such a perfect recipe in a detailed way. Love from Mubshra.
justamumnz says
My pleasure! I’m so pleased you enjoyed it.