A delicious old fashioned version of Peppermint Slice that is both easy and very very tasty indeed! A no-bake base makes it even quicker to put together.
When I was a young girl I received a recipe journal from my dear Aunty Marilyn. I would sit at her bench while she baked or pottered around and write up some of her favourites. It is so lovely to look back at it and see that I was interested in collecting recipes even then.
Two recipes that I am sharing from this are her Coffee Slice and Peppermint Slice – both the same recipe really, only change is with the flavours and a few ingredients.
Me being me, of course I have changed them a bit to make them a bit ‘chunkier’ and substantial. But I will show the original recipe below the recipe card if you are searching for a classic Peppermint Slice.

This recipe is therefore likely the same that your family has made in the past, it’s so lovely to have recipes like this that stand the test of time and are passed down.
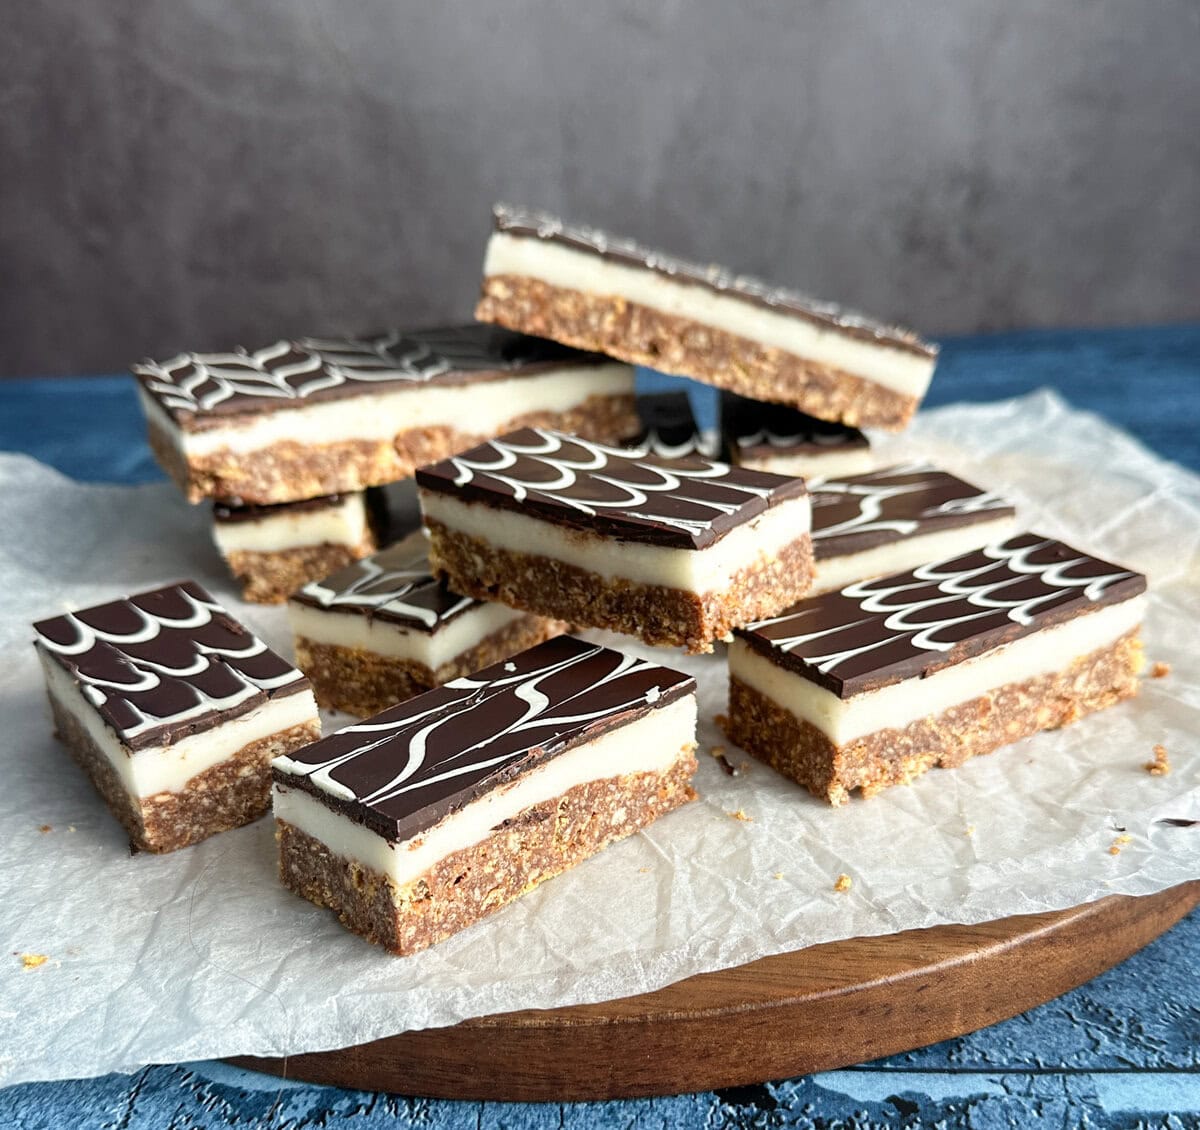
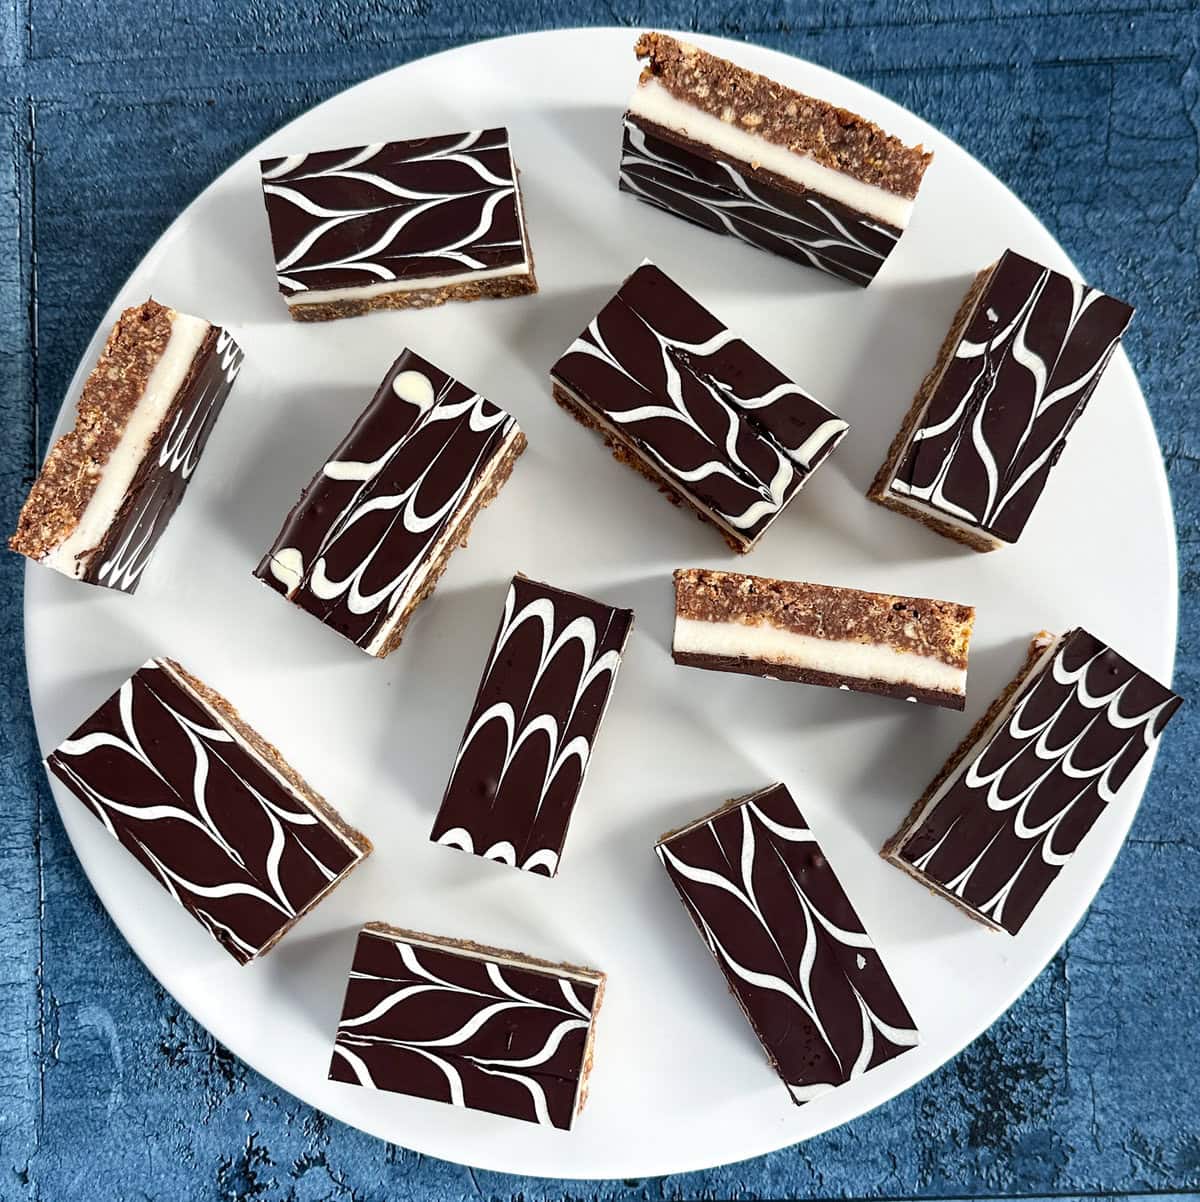
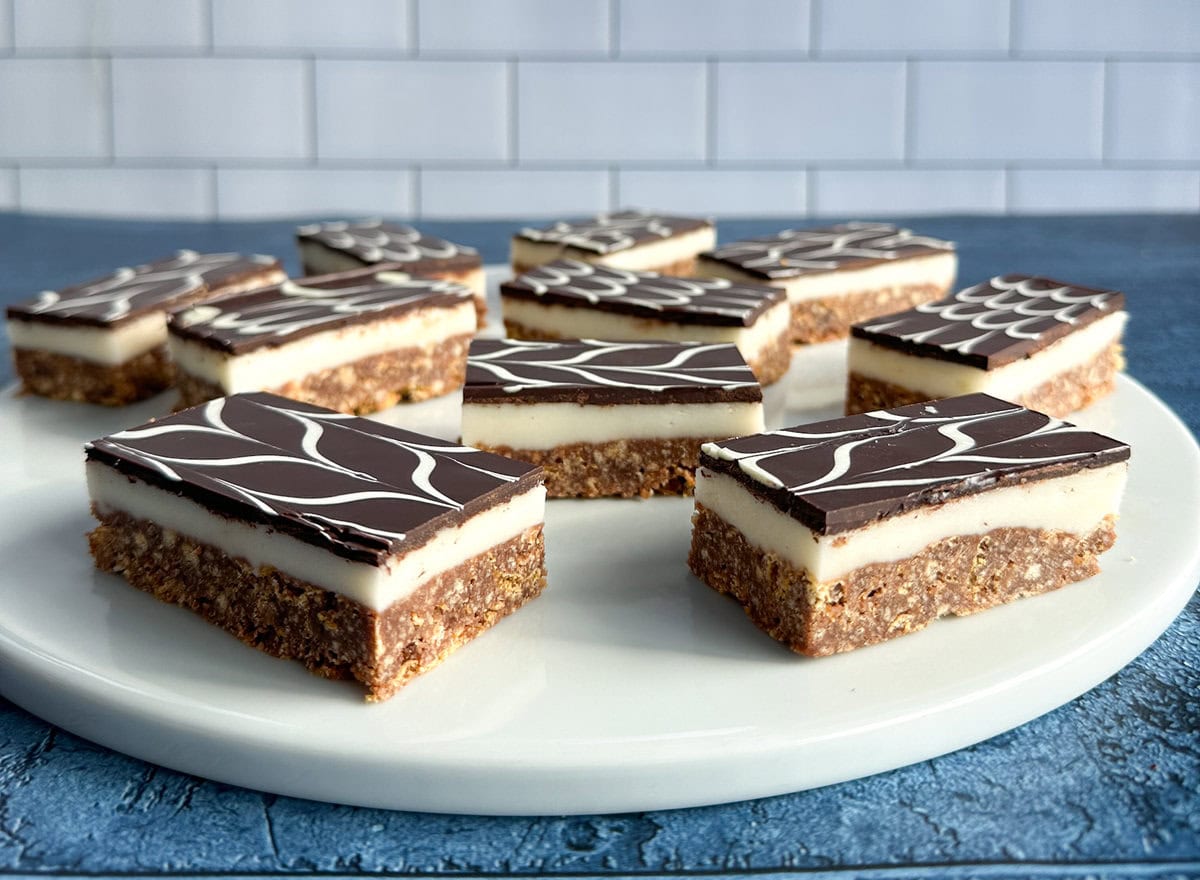
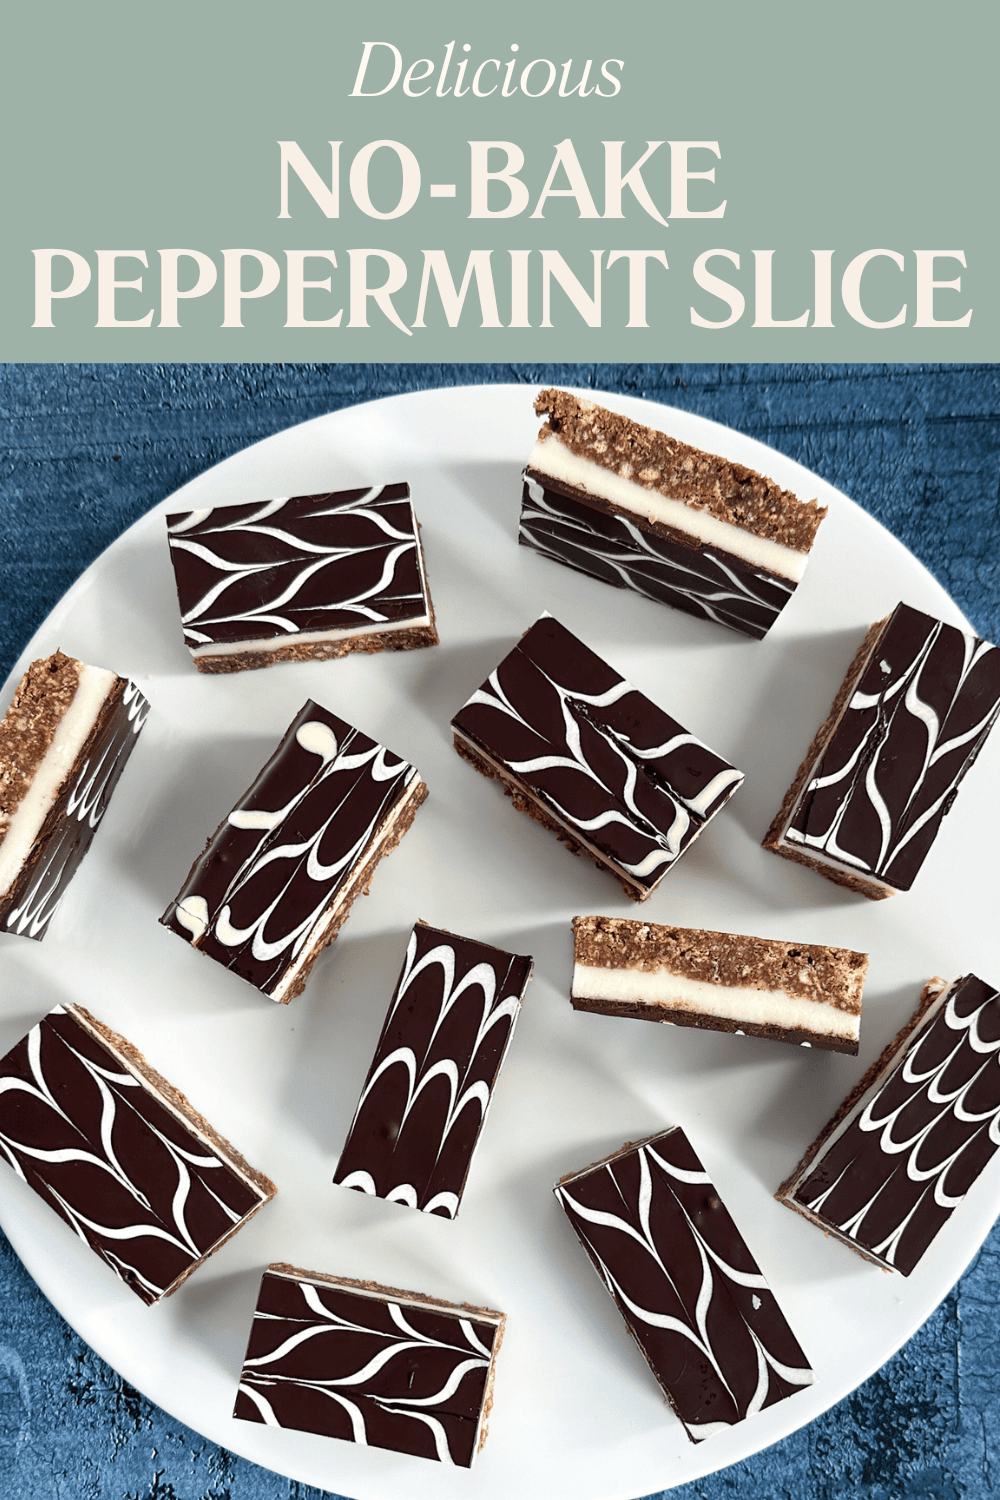
So as I said I have made a few changes – the biggest change is that I have tripled the peppermint filling! I think in part, because I think it looks fabulous, but also because it is a lovely balance to the base.
The ingredients are all pantry basics. I use peppermint essence, depending on the strength of your variety, you may wish to use a little less than 3 teaspoons to begin with, you can always add more as you go. But I definitely want this to taste of peppermint, not just a hint wandering by!
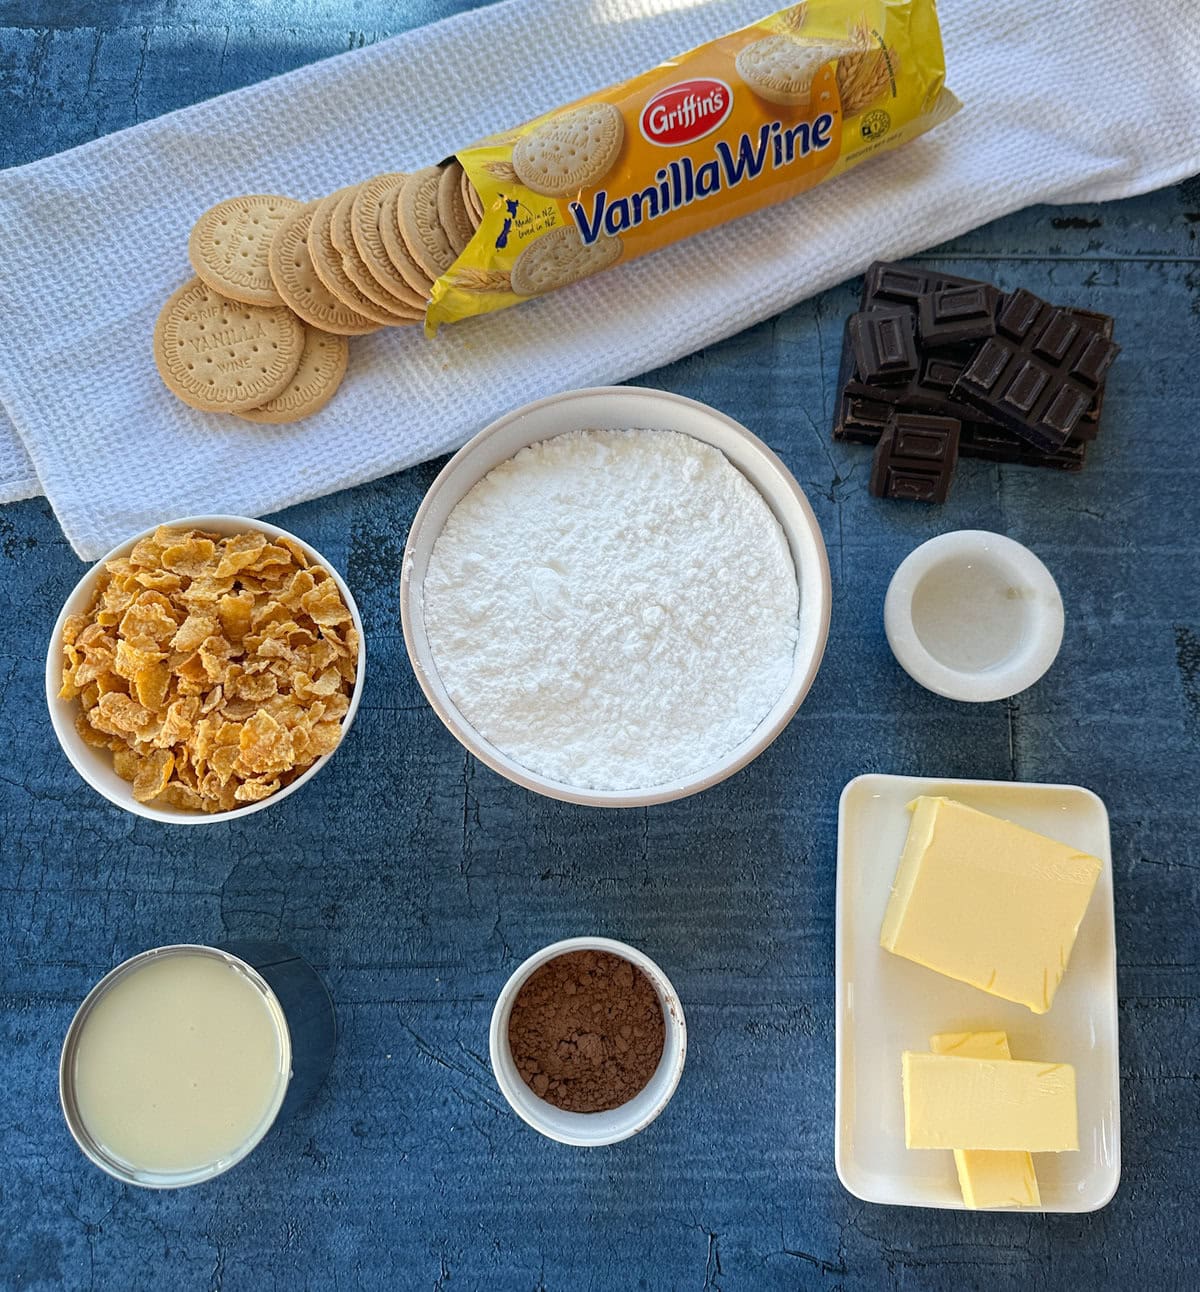
I have also made a slight change to the base, I have used cornflakes instead of coconut, but you can use either here. This is just an alternative for those that cannot have coconut or do not like the taste. It turns this peppermint slice into a sort of peppermint crunch slice, with a lovely textured base.

The filling is a simple combination of icing sugar, melted butter, peppermint essence and boiling water. I have reduced the butter from the original recipe, but it is lovely if you prefer that one.
Given that I tripled the icing sugar I did not want to triple the butter – in this economy!!
The original recipe does not mention an icing, but I have topped this with a thin layer of chocolate, and then to be a bit fancy and catch your eye, I have also done a simple white chocolate feathering pattern on top. If you prefer you could just drizzle dark chocolate over the top for a hint of chocolate.
So onto the recipe. No fussy techniques, just a delicious easy slice that is sure to impress. Please see here the original version if you wish to stick to the proper way!
If you are a fan of no-bake slices check out some of my favs here too
No Bake Citrus Slice
No Bake Chocolate Fudge Slice
No Bake Marshmallow Slice
No Bake Caramel Slice
Enjoy this updated version of an old fashioned No-Bake Peppermint Slice
No-Bake Peppermint Slice
Delicious classic no-bake peppermint slice with a lovely crunchy base, creamy peppermint filling with a thin chocolate topping.
Ingredients
Base
- 115 grams Butter, cubed
- 190 grams Sweetened Condensed Milk, (1/2 tin)
- 2 Tablespoons Cocoa Powder
- 250 grams Vanilla Biscuits (or Super Wine, Marie, Arrowroot, Rich Tea etc)
- 1 Cup Cornflakes, 40 grams (OR 3/4 Cup Dessicated Coconut, 70 grams)
Filling
- 3 1/2 Cups Icing Sugar, 490 grams
- 50 grams Butter, melted
- 3 teaspoons Peppermint Essence
- 3-4 Tablespoons Boiling Water + extra
Topping
- 180 grams Dark or Semi Sweet Chocolate (50%)
- 1/2 teaspoon Vegetable or Canola Oil
- (Optional for pattern)
- 50 grams White Chocolate
- 1/8 teaspoon Vegetable or Canola Oil
Instructions
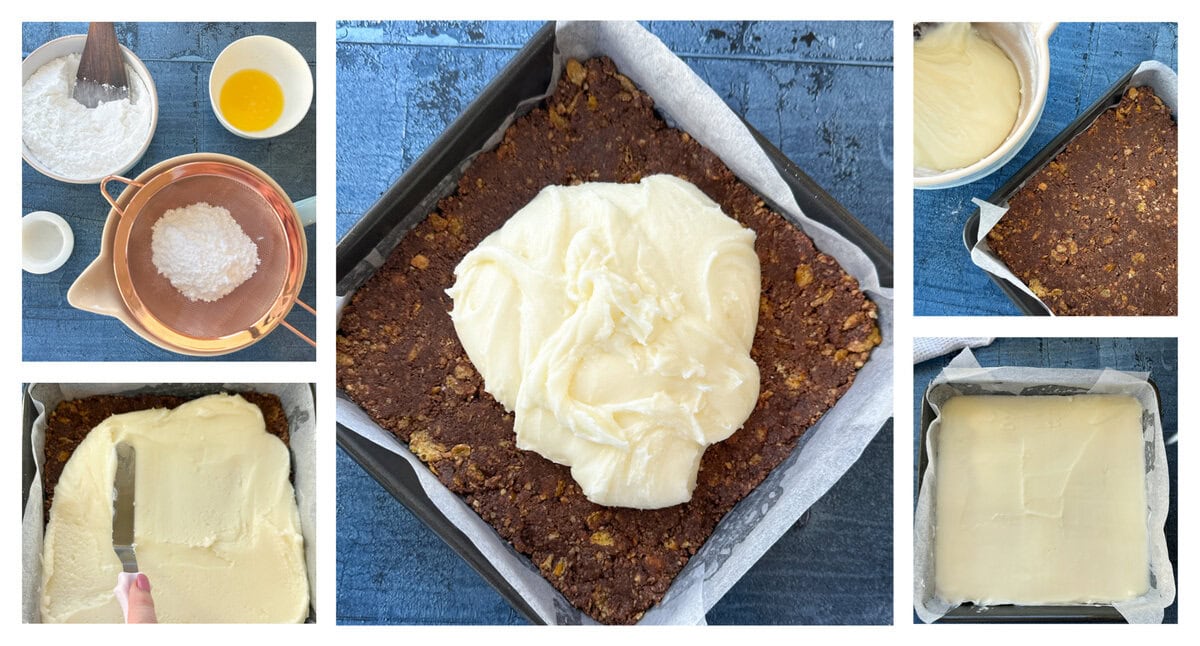
- Prepare a 23cm square slice pan by lining it with baking paper. I like to spray a little cooking spray on the pan before the paper to help it stick to the pan. Ensure at least two sides come above the top of the pan, to make lifting the slice out easier later on.
- You can melt the first three ingredients in the microwave or on the stove top.
- In a microwave proof bowl OR saucepan, add the first measure of butter, condensed milk and sift in the cocoa powder
- Heat in microwave in 30 second bursts until the butter is melted, OR on the stovetop on a medium/low heat until the butter is melted. Stirring often.
- Crush the biscuits in a food processor or blender and add the crushed biscuits along with the cornflakes (OR coconut if using) to the melted ingredients and stir well to combine. Give the cornflakes a little smash as you mix them through!
- Spoon this into the prepared pan and spread evenly to the edges. Use the base of a 1/3rd measuring cup to ensure the slice is well compacted, smooth & even.
- Pop this in the fridge to cool while you prepare the filling
- For the filling, bring a kettle of water to the boil.
- Melt the butter in 20-30 second bursts in a small bowl in the microwave until completely melted, add the peppermint essence to this and set aside.
- In a medium bowl sift in the icing sugar, add to this the melted butter & essence and mix with a wooden spoon or strong spatula to combine well
- To this add 3 Tablespoons of boiling water and stir together well. Then add a further tablespoon of boiling water and mix well ensuring no lumps.
- Add a teaspoon at a time of boiling water until you are happy that the consistency is thick but just soft enough to spread smoothly.
- Pour this over the sightly cooled base, then using a large spoon or an offset spatula dipped in hot water, spread the filling until it is an even smooth layer.
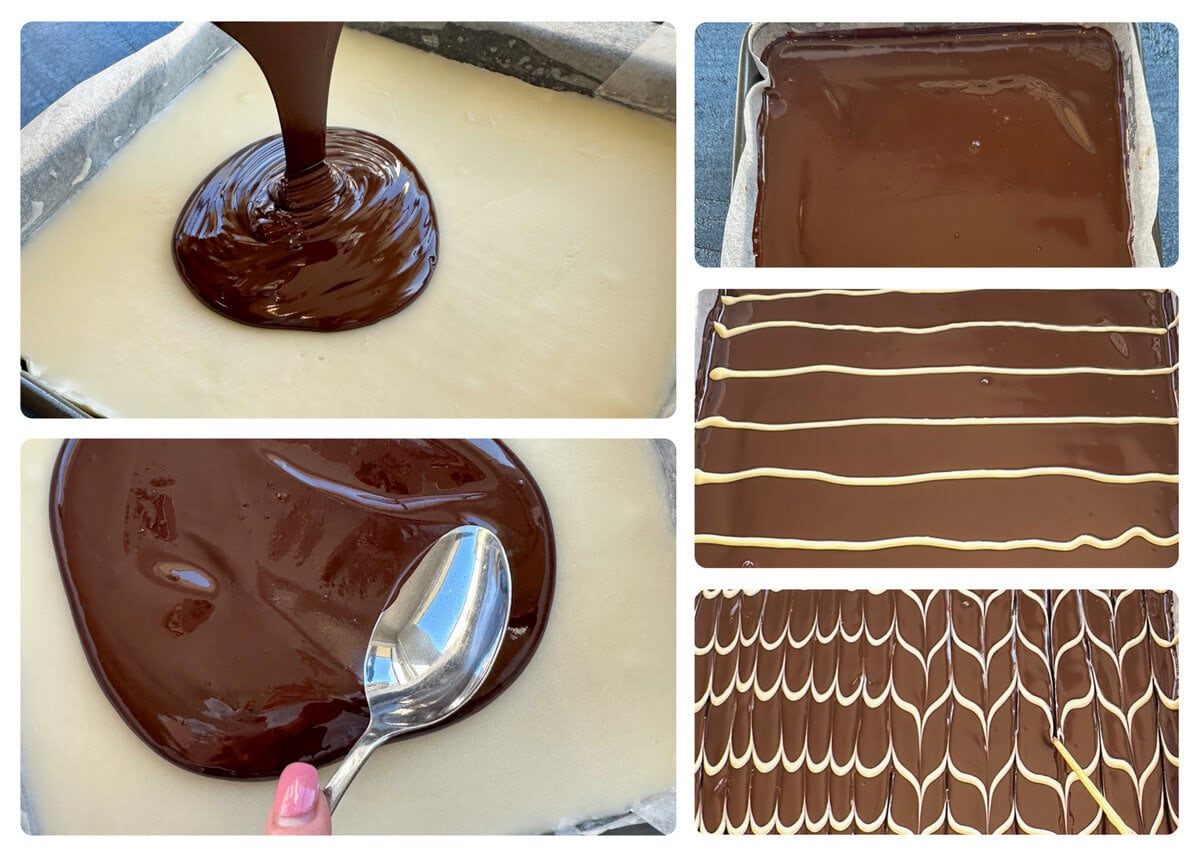
- Place this in the fridge for 20 minutes to begin to set, while you prepare the chocolate.
- Place the dark chocolate in a small microwave safe bowl, melt the chocolate in 20 second bursts, until only a few small lumps remain, then mix those in well until smooth. Use 70% power if your microwave high powered.
- Add to this 1/2 teaspoon of oil and mix through well and set aside
- If using, place the white chocolate in a small bowl, and heat in 10-20 second bursts until only a few lumps remain then mix them in. Then add a little dash of oil and stir well.
- If you are using the white chocolate to create a pattern, add the white chocolate to a small ziplock bag and get a toothpick or kebab stick.
- Spread the dark chocolate over the cooled filling, working quickly. Use the back of a large spoon or an offset spatula to ensure the chocolate is smooth. Then give the whole dish a jiggle to settle the chocolate evenly.
- To create the pretty white chocolate pattern, cut a tiny corner of the ziplock bag off, and squeeze gently to draw lines of chocolate 1 cm apart in one direction.
- Then take your skewer and drag a line up through the lines you have just drawn, and then one down in the opposite direction, 1 cm apart and repeat across the slice.
- Give the slice a gentle jiggle to settle the chocolate to a lovely smooth layer and pop it in the fridge to set, approx 2-3 hours.
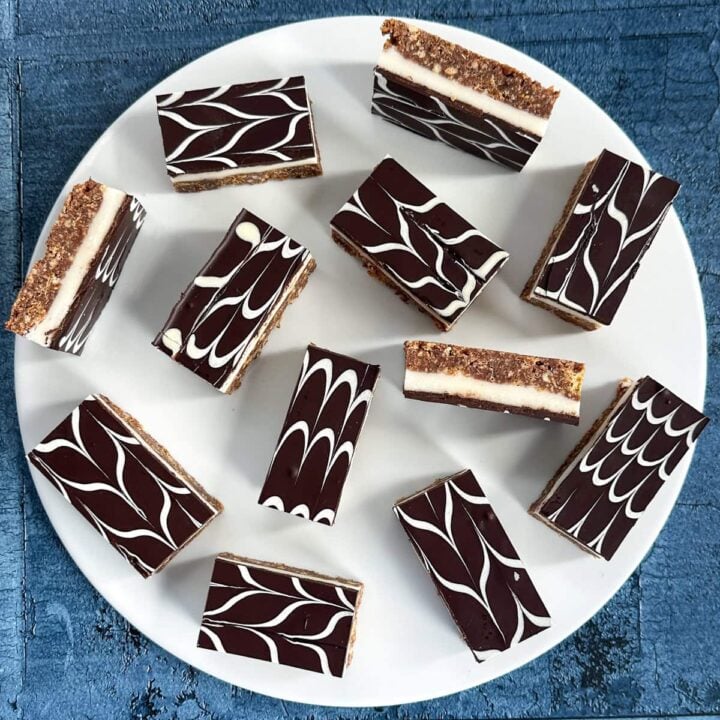
- Once set, remove from the tin using the baking paper to lift the slice.
- To cut, dip a large sharp knife in hot water, dry it off, then cut the slice in half, dipping and drying the knife between each cut.
- Then cut each half into quarters, then cut each segment into squares or bars.
- Store at room temperature in an airtight container for 4-5 days, or wrap well in plastic wrap then an airtight container to freeze for up to 3 months.
- Enjoy!
Notes
The original Peppermint Fudge Slice recipe
Melt together:
- 4 Oz Butter
- 1/2 Tin Condensed Milk
- 2 Tablespoons Cocoa
- Add 1 packet of crushed biscuits and 3/4 cup of coconut and mix in well
Press into a tin and ice with:
- 2 Oz melted butter
- 6 Oz Icing Sugar
- 1/2 teaspoon Vanilla
- 1 teaspoon Peppermint Essence
Nutrition Information:
Yield: 24 Serving Size: 1Amount Per Serving: Calories: 258Total Fat: 11gSaturated Fat: 6gTrans Fat: 0gUnsaturated Fat: 4gCholesterol: 18mgSodium: 85mgCarbohydrates: 35gFiber: 1gSugar: 31gProtein: 2g
JustAMumNZ.com, occasionally offers nutritional information for recipes contained on this site. This information is provided as a courtesy and is an estimate only. This information comes from online calculators. Although justamumnz.com attempts to provide accurate nutritional information, these figures are only estimates.
I hope you love this recipe. Feel free to send me some photos if you make it, and give it a star rating above.
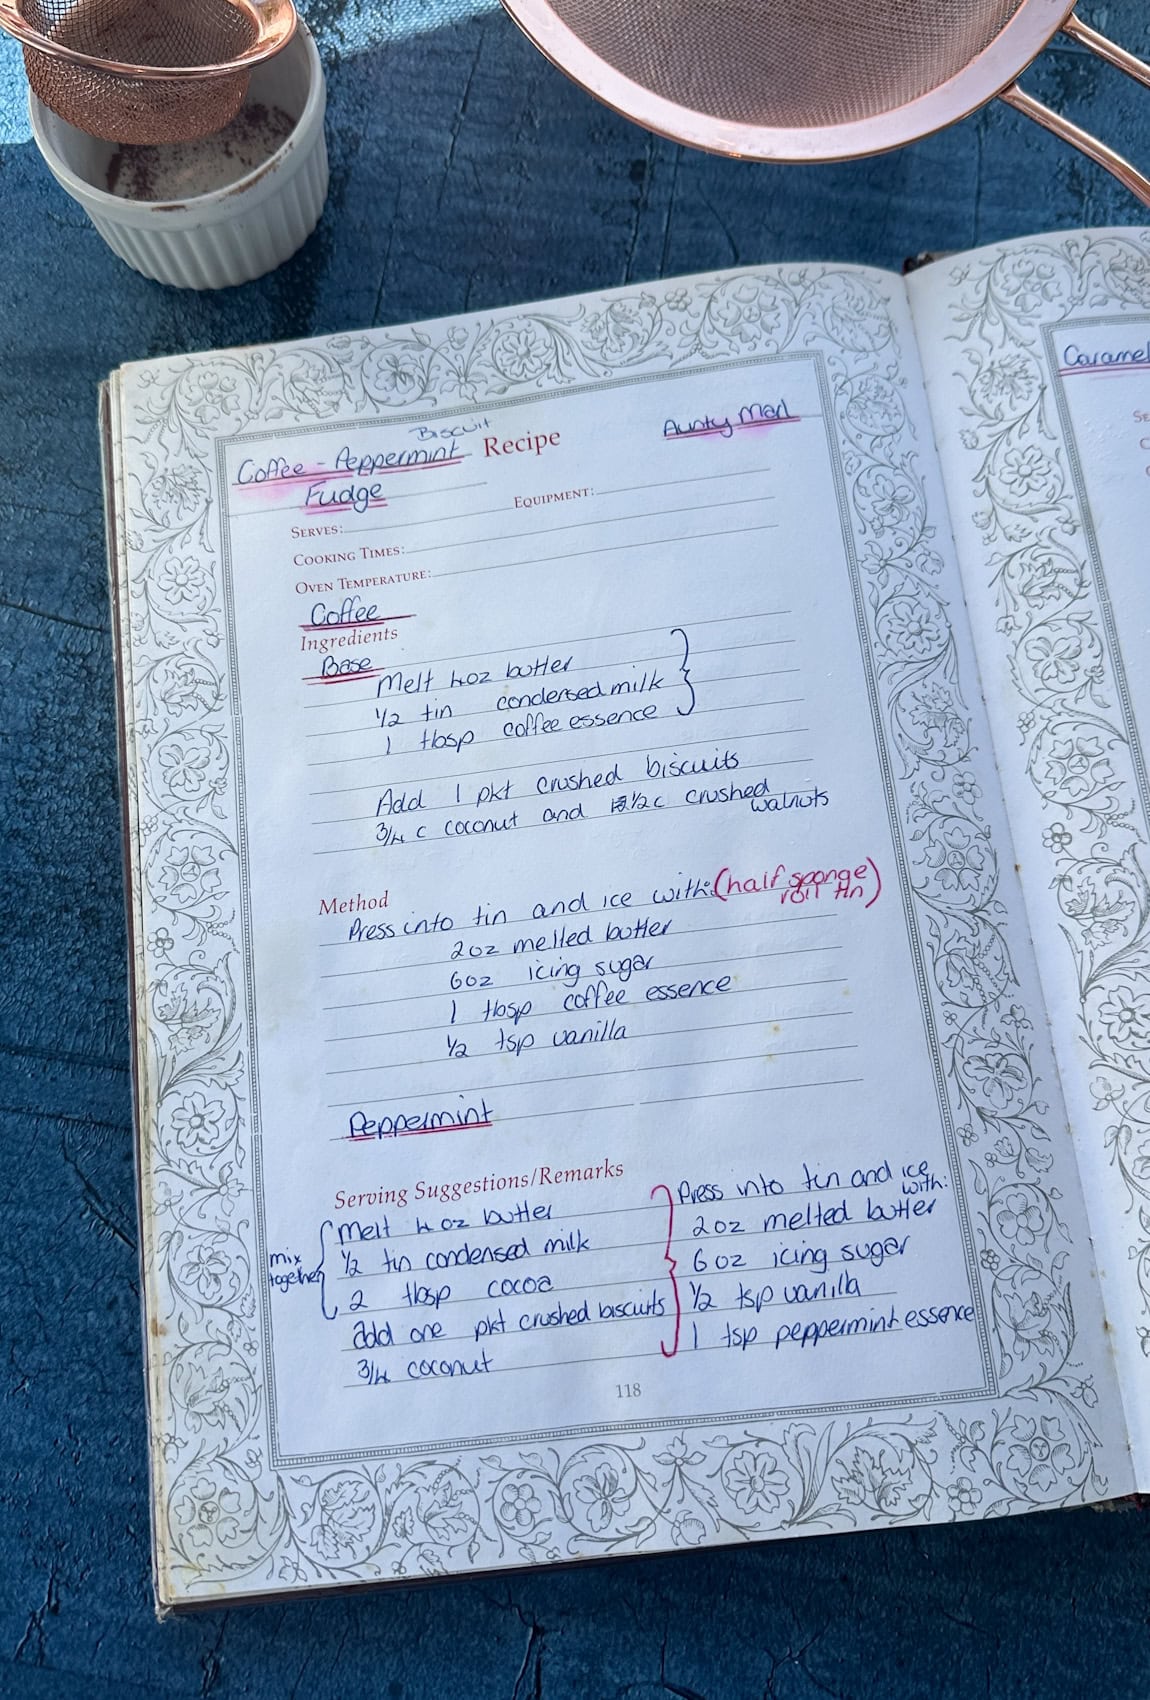
My recipe journal from the 90’s and the original Coffee or Peppermint Slice recipes. Feel free to make this version.
Thank you so much for stopping by to check out this recipe, you can follow me on Facebook & Instagram and also follow this blog via email to receive all my recipes as I publish them so check out the subscription box below.
Happy Baking!
Anna
Pin It!
I love hearing from you! What do you think of this recipe?